Monday, June 1, 2020

The "12 Days of Christmas" Collection


Circa 2010, I realized I had several Christmas decorations that fit the "12 Days of Christmas" theme, and decided it would be a nice idea to collect Christmas ornaments on that theme. I've always liked the Christmas carol, as it's fun and secular (no, the song did not originate as a coded way for persecuted Christians to celebrate Christmas), and I thought it would be a fun challenge to translate the theme into beautiful Christmas decorations.

I mentioned this plan to my mother and sister, and they've been helping me out with this collection via their subsequent Christmas gifts to me, especially my sister, who has never really gotten past the beginner levels of needlework and crafting but is what I would call a creative shopper. And with this post I'm stepping a little outside the format for this blog so I can show off my collection -- though I will say that some of the items are handmade so the collection is still reasonably appropriate for a Modwardian post. The collection is incomplete as of this post's original post date with five items missing, but I will add the remaining items as I get them.

The photo above is a counted cross-stitch piece that I made from a kit I received from my sister-in-law for Christmas 2011. I stitched it the next year, setting myself the task of working certain areas each month for ten months, with November reserved for getting it professionally framed. Then when December 1st arrived, it was all ready to hang for Christmas 2012. It's probably one of my most treasured Christmas ornaments, and it's certainly the one that took the most work.


A "partridge in a pear tree" stocking. I bought the needlepoint kit from a thrift shop for $5 years ago, and once I'd worked the canvas, sewed the stocking together. The instructions didn't call for a lining, but I had some red satin lining on hand and lined it with that as I thought it made it look more finished.


A "partridge in a pear tree" platter I found at the Salvation Army Thrift Shop for $2.99 in October 2020. My mother used to set out a special Christmas tray of assorted nuts in shell, along with a nutcracker, every Christmas, and I think I might do the same with this platter.


Two turtledoves. My sister gave me these many years back. She painted them herself.


Three French hens. These were another gift from my sister. I've often thought that perhaps I ought to paint fleur-de-lis on their sides, to make them truly French.


Four calling birds. This one was also a gift from my sister. It's a Wedgwood ornament. Alas, I have never had a Christmas tree since I've been living on my own (it seems silly to get one given that there's just me here and I go home to my parents' place for Christmas), and every year when I'm unpacking the Christmas ornaments, I see it in its blue box, sigh over its exquisite beauty, and think that at some point I really must find a way to display it without a tree.


Seven swans a-swimming. This was a $5 thrift shop swan candelabra that sits on my piano all year, and in December it becomes a Christmas ornament. Of course there are only four swans on it, but I do have more than three swans elsewhere in the room, given that I collect swans too.


Nine ladies dancing. This photo was a gift from my sister too. She has definitely been persistent in her effort to help me complete my collection -- she's bought more of these items than I have.


My mother gave me a "12 drummers drumming" centrepiece that she had made for me some years back. It, uh, does not quite look the way it originally did when she made it and gave it to me, because I reworked it a little in 2020.


My sister gave me this lovely little book as a stocking stuffer for Christmas 2018. I bought the little wrought iron stand it sits in so that I would have a way to display the book during the Christmas season. I try to remember to turn a page each day during December.


I also got this Indian cotton "Twelve Days of Christmas" tea towel one Christmas -- can't remember if it was my mother or my sister who gave it to me. Seriously, what would they give me for Christmas if it weren't for this endeavour of mine? 


 A 12 Days of Christmas bowl that I bought from Value Village for $6.10. I use it as a candy dish and set it out with the assorted nut "partridge in a pear tree" platter.


 A 500-piece 12 Days of Christmas jigsaw puzzle I got from my sister one Christmas. 

How a Centrepiece Came Out of the Closet


Some years back my mother gave me a Christmas centrepiece that she had made for me. I hope I don't sound like an ingrate here, but as soon as I unwrapped it on that Christmas morning, I privately and silently decided that I would rework it at some point. That centrepiece sat in its box in the back of my hall closet for I don't know how long, waiting for me to get to it. Last fall when I was cleaning out the closet I decided the time had arrived to redo it.

Incidentally, this was the same closet clean out that led to my upcycling the canopies from three old umbrellas, and also moving my yoga mat from the back of the hall closet to the front corner by the door, where it would be much more easily accessible. I started doing yoga just a few weeks later. Cleaning out your closets can change your life, people.


This is how the nutcracker centrepiece looked when I received it. My mother had glued what I suspect were dollar store nutcracker tree ornaments, some plastic greenery, and an LED candle encased in plastic, to a plain, unfinished board from my father's woodworking shop. The idea was that it was supposed to be the "12 drummers drumming" decoration for my "12 Days of Christmas" decoration collection, but while I liked the concept of the centrepiece, and appreciated the thought and effort that had gone into it, I didn't like the execution.

I'm not normally indecisive, but occasionally I do have a very difficult time coming up with a project plan. This was one of those times. It took me a ridiculously protracted amount of time to figure out exactly what I was going to do with this centrepiece. I'd never made one before and I seemed to have a lot of trouble envisioning it. The candle and greenery were definitely going... somewhere else. I decided I would get a new base -- a round or oval one would work -- and paint it red using some red paint I'd bought to paint a little cupboard I was planning to put up in my kitchen. I found a new base promptly: it was a $4.52 round cheese board from the dollar store. I thought the nutcrackers could be ranged around the edge, and I could put something else in the middle, but what?

At this point I did what I do when I can't figure out what to do with some decorating or craft project -- I turned to my two closest friends: Christine and Lindsie. They both have excellent taste and good ideas, and I can't tell you how many times I've been in an agony of indecision while at some crafting or home furnishing store and wished I had them with me. I emailed Lindsie a picture of the original centrepiece and said I was trying to figure out what to do with it -- what should form the new centre of this centrepiece? Lindsie suggested a tree. I got a 12" tree from Michaels for $8.14, as well as a box of 10 spools of Christmas ribbons for $10.13, and I bought a $5 piece of red felt for the bottom.

Then I pried the nutcrackers off the old base -- they were glued so firmly in place that I had to use a hammer and chisel for some of them. (Very thorough woman, my mother.) I put together a mockup of the centrepiece, arranging the nutcrackers on the base around the tree, and emailed a photo of it to Christine, saying I wondered if I should decorate the tree with tiny ornaments, perhaps sewn to a ribbon wound around the tree. Christine advised against decorating the tree, but suggested I paint the base of the nutcrackers, which were blue, red, and green, in a single colour to make it look "less folksy". I did take her advice about the nutcracker bases, but I couldn't get past the feeling that the tree needed something, and experimented with decorating the tree with ribbons and a gold star from my beading supplies before I finally figured out exactly what I was going to do.


This is the finished centrepiece.

One side of the cheese board had the word "CHEESE" and the names of various kinds of cheeses inlaid upon it, and the other side was plain. I painted the plain side, the rim of the board, and the edge of the under side in red, and then put two coats of acrylic finish on top of that. I glued a piece of red felt to the bottom, then a length of tartan ribbon to the edge. Two of the little drummers have adorable tiny tartan drums, and I thought it made for a nice touch to echo that tartan with a similar tartan ribbon.

So much for the base. I painted the bases of the nutcrackers in cream craft paint, to match the base of the tree -- a finicky job requiring numerous coats and touch ups, but worth it. I also did a little re-gluing where needed -- some of the nutcrackers were losing their drumsticks, helmets, or even arms. I think my mother snipped what appears to have been gold thread hanging loops off some of their helmets, so I clipped the remaining gold thread as closely as I could, and then touched up the remaining nubs in black craft paint to make them less noticeable. (I tried prying out the nubs, but was unable to get them to budge.)

As for the tree, I decided on a simple ribbon bow topper. I wanted to use the tartan ribbon I'd used on the base, but when it didn't stand out against the tree with the kind of definition the red satin ribbon did, I sewed the tartan and red ribbons together and then made two bows and stitched them in place. The resulting two-layer ribbon is quite stiff and holds its shape rather than drooping, which was an added bonus.

And, finally, I glued the tree and the nutcrackers in place, and my centrepiece was complete. I spent more on this project than I had hoped to, but I still have lots of Christmas ribbon and red felt left that can be used for other things. While the end result doesn't have quite the professionally designed look I wanted it to have, I think it turned out pretty well, and am looking forward to seeing it on my kitchen table this coming December.

I just hope my mother doesn't remember giving me a handmade nutcracker centrepiece that vaguely resembled this one. She's 81 and her memory is getting a little iffy, which can sometimes be to my advantage. There's a certain made-in-Scotland MacBeth tartan scarf in my possession that is not the same scarf as the made-in-Scotland MacBeth tartan scarf she brought me back from Scotland when she and my father travelled there years ago, and that I subsequently lost, and she has never noticed the difference, even though the closest replica I was able to find online wasn't that close.

Also, she has never used the internet in her life and wouldn't read my blog if she did, so I think I'm at least safe from giving myself away via this blog post.

Wednesday, April 22, 2020

A Smart Set


This project plan began when I was making my knitting list in late 2019 and decided to knit my honorary niece Olivia a sweater for her Christmas 2020 present. I'd picked out a really cute pattern that required DK yarn for it. Then I got 700 grams of the Loops & Threads Meandering Serpentine in dark salmon (pictured above) in my stocking on Christmas Day, 2019. (Santa has, um, large stockings to fill at my parents' place.) I decided I ought to use some of that yarn to make Olivia's sweater rather than buying new yarn -- it suits her colouring -- so I searched for a suitable worsted weight design for it.


I settled on the pattern depicted above, which is the Children's Celtic Braid Top-Down Sweater, designed by Vera Sanon. It's a nice classic piece, and I'm always an easy sell on Celtic-style cables.


Then, because I had loads of the Meandering Serpentine to work with, I selected a hat pattern. Little girls do like their clothes to have matching accessories such as hats and purses. I wasn't too picky about the hat design -- it just had to be a worsted weight tam pattern that was suitable for adapting to match the sweater. I decided on the Little Bird Hat, designed by Brew City Yarns.


And here's the finished sweater. The pattern was a straightforward one and reasonably clearly written, so the knitting proceeded quite smoothly. It's knitted in one piece out of a single yarn, so there was very little finishing to do.


Then I made the hat. Instead of making the band a plain rib as the pattern calls for, I used the twisted rib stitch from the neckband, cuffs, and hem of the sweater. I nixed the stitchwork used in the body of the hat in the design, and just knitted the hat in plain stockinette. Then, because the resulting hat looked a little too plain, I added a tassel to the top.


The sweater and cap together do make for a smart little set.

This project used 240 grams of what I'm going to count as stash yarn, given that I didn't buy it myself. I still have 460 grams of the Meandering Serpentine left, but never fear -- I have a plan to use that up too.

Wednesday, April 8, 2020

Olive and Jade


This project plan began when I decided I'd like a cotton sweater to go with with my summer weight olive khaki pants and shorts. I liked the idea of a classic Breton striped sweater in olive and a contrasting colour, so I thought I'd make one in that style.


I searched Ravelry for a suitable striped sweater pattern and settled on Nothing But Stripes!, designed by emteedee, which is an interesting contemporary take on the Breton stripe sweater and looked great in all the project photos I looked at. I visited Toronto's Romni Wools store to shop for suitable yarn, and was happy to find yarn that was just what I wanted at a bargain basement price in Romni's actual bargain basement: 200 grams of Schachenmayr Catania Solids in 253 Jade, and 200 grams in shade 414, which doesn't seem to be listed on either Ravelry or the Schachenmayr website, but is a deep olive.


And here's the result, paired with a light khaki skirt I made some years back. The olive khaki pants and shorts I have are darker in tone and will work better with the sweater, but I can't put them on my dressmaker's form.

A sweater that I should have been able to make in under three weeks ended up taking nine for reasons that were my own stupid fault. First I assumed that a size 38 German was equivalent to a size 38 in inches. It so wasn't, and I got as far as the chest before I realized it. I had to rip it all out and start again in a size 42. Then I realized as I was nearly done the body that the sweater was going to be far too long -- I should have done the math on the stripes. I had to rip back nearly to the beginning that time, and begin the stripe pattern with two rows of the olive instead of just one.

It was around this point that I also realized that I hadn't bought enough yarn to make the larger size. I went back to Romni Wools where I bought two extra 50 gram skeins of Olive and one extra 50 gram skein of Jade -- it was the last skein of the Jade that they had, and I could only hope I was going to have enough yarn.

Then when I was nearly done the first sleeve, I realized it was going to be too short, and I had to rip it out, calculate what the stripe pattern needed to be to make it the right length (I had to add *two* "8 rows of Jade/8 rows of Olive" stripes), and reknit it that way.

Then too, soon after I began work on the first sleeve, I realized I had made a mistake with the increases on the yoke. It had come out too short compared to the measurement on the diagram pattern, and I added an inch which proved to be a mistake, as that last inch was created by the stitches cast on when the body was connected under the armhole. That inch I had added made the yoke too long and the body too short, which in turn made for an awkward-looking fit. At first I couldn't face the idea of ripping out nearly the entire sweater yet again and I thought I could live with it, but after I finished the first sleeve and tried the sweater on, I realized I couldn't. I ripped out the sleeve, and ripped out the body back to the bottom of the yoke, and reknitted it yet again. This time I managed to get it right. You can imagine how many extra ends I had to deal with when it came time to finish the sweater, but I just got on with it and got it done.

I think I essentially knitted this sweater three times over. Fortunately, after all of that, I do quite like the sweater.

And I had just 40 grams of each colour of yarn left, so I had bought the right amount of yarn for my sweater too. As this project was made with new yarn, that's a stash increase of 80 grams.

Friday, February 21, 2020

A Tale of Three Umbrellas


This crafting project began when I cleaned out my hall closet late last fall.


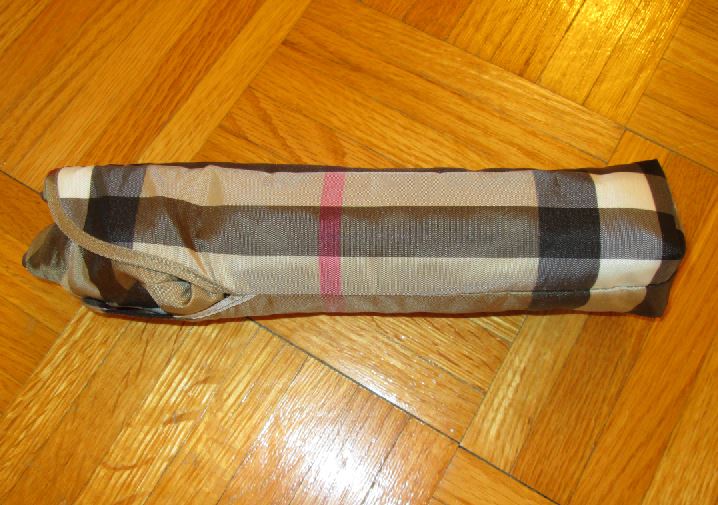
While cleaning out the closet, I came across two broken umbrellas. The compact that you see in the picture above is a Burberry umbrella that I bought via eBay years ago. It had a very frail structure that didn't last very long -- perhaps two or three outings. The walking umbrella below the compact is not a genuine Burberry, but one of the imitations one used to be able to buy in the early 2000s, before Burberry (understandably) began cracking down on the use of unauthorized/imitations of their trademark tartan. That walking umbrella stood me in good stead on rainy days for years, but eventually broke. It's impossible to find a Burberry-esque tartan umbrella now, and I can't afford even a secondhand Burberry umbrella these days, so I hated to just throw these umbrellas out. First I looked into the possibility of repairing the umbrellas... or rather the impossibility of repairing them. Then I turned to the idea of buying a new umbrella of the same size and stitching the old canopy on it, but though I kept an eye out for suitable new umbrellas for some years, I was never able to find umbrellas of the same dimensions, and had given up on that idea. I was tired of having a couple of unusable old umbrellas sitting around taking up space in my tidy closet, so I decided it was at least time to get them out of there.

I then ripped the canopies off the broken frames, threw the frames out, and ran the canopies through the wash. This redefined my challenge completely: now I had two fairly sizable pieces of no-fray, durable, waterproof, nylon fabric in an attractive tartan sitting on my sewing table. What might I do with them?

I very quickly decided I would make a tote bag out of the compact's canopy, because it would make a perfect stocking stuffer-type present for my sister who, judging from some of her pins on Pinterest, likes Burberry tartan just as much as me. I found a tutorial for a reversible lined tote bag on the net, and wondered what I could use for the lining. My sister likes black, so I thought some black nylon would work. I considered buying some. But before I could do that, I found a broken walking umbrella abandoned just outside the grocery store one day when it had been raining on and off and I was making a quick trip to the store to buy kitty litter during one of the non-rainy intervals. On my way back home, I picked it up and tucked it under one arm and carried it back to my house (along with a jug of kitty litter in each hand). I probably looked like a crazy person, but there was method in my madness. Once home, I ripped the black umbrella's canopy off its frame, threw out the frame, and ran the third canopy through the wash as well.


Cutting out the bag pieces proved a bit of a challenge. The compact-sized canopy just wasn't that big. I couldn't seem to find a way to lay out the half-size pattern piece twice on a fold the way the directions called for. In the end what I did was cut out the black lining pieces first and prepare two half-size paper pattern pieces. Then I pinned one of the black lining pieces flat on the canopy in order to use it as one full pattern, and then pinned the half-size pattern pieces on each side and chalked a 1/2" seam allowance for each. There was very little wiggle room for tartan-matching, but I managed to do pretty well on that score anyway. Just for the heck of it, I also ripped out the little Burberry tag that had been on one of the umbrella canopy seams. Then it was time to sew the pieces together.


The finished bag. I think it turned out pretty well, and even has a certain style to it.


The front and back of the tote bag. The pieced side doesn't look so bad. I thought seaming the two halves together made for a rather interesting effect.


The bag as it looks "inside out". My sister will have the option of using whatever look works best with her current outfit.


I sewed the original Burberry tag into the seam high on one side of the bag, then stitched the other three sides of the tag down (it wasn't a reversible tag). I thought it made for a nice finishing touch.


And for a final finishing touch, I rolled up the bag and stuck it in the original umbrella case. Having a little storage case for the tote bag will make it easy for my sister to keep the tote in her handbag for times of need.

So much for most of the compact umbrella canopy, and some of the black umbrella canopy. Now, what was I to do with the tartan canopy from the walking umbrella?


I toyed with the idea of making another tote bag for me, but I didn't much like the idea, given that I have a set of six tote bags already and don't need or want any more. Then one day an idea came to me. I've had the little case you see depicted above for over ten years, and use it to hold my manicure kit. It sits on a glass shelf in my bathroom, and looks nice there, but the lining had become stained. I was looking ruefully at it one Sunday morning as I was giving myself my usual weekly manicure, and thinking how bad it looked, and then it occurred to me that perhaps I could fix it by relining the manicure case. I looked closely at the lining and it seemed to me that it would be quite possible to replace it. Then I wondered what kind of fabric I would use to reline it, and it dawned on me that I had the perfect fabric on hand: a fabric I'd been looking for a way to use, that was waterproof nylon and could very likely be wiped clean in case of spills, and that would look really nice as a lining for that particular case. Who could ask for more?


The first step was to rip out the old lining. It was just fabric, cardboard, and glue. I kept all the pieces to use as patterns for the new lining inserts. The ribbons that hold the lid were still clean and in excellent condition, so I didn't remove them. While I had the case stripped down, I did some restorative gluing of some of the outer parts of the case that were coming loose.

I dug through my art supply cupboard and found some pieces of light cardboard I'd tucked away to use sometime -- things like inserts from a package of stockings, or remnants of poster board from some project. I did wind up reusing the strip of cardboard that lines the curved front side of the box, as I didn't have any cardboard of the size and flexibility to replace it. I always keep a bottle of glue on hand.


And here's the case with its new tartan lining.

The task of relining the case was pretty straightforward: I'd trace around the old piece of lining on one of my pieces of cardboard, cut the new piece of cardboard to match the old, cover the new lining piece with a piece of tartan nylon cut from the umbrella canopy using glue, and then glue the new lining piece in place in the reverse of the order that I'd stripped them out: first the bottom piece, then the curved side piece, then the back, then the lid piece. I elected not to put the mirror back in, as I don't need a mirror for manicures and pedicures. I'm really pleased with the new look.

But I did have quite a bit of that tartan walking umbrella canopy left, so....


I also made two new vanity cases out of the remaining tartan, and lined them with a white nylon lining fabric I had leftover from some project I made many years ago. One holds my emery boards, and the other holds my cotton balls and cotton swabs. I am as pleased with this manicure kit project as I was with the tote bag. I haven't just relined my manicure case -- I've upgraded it, and my only expense was two new zippers, purchased from Fabricland using a 50% off coupon.

But I still wasn't done.


I had been thinking for awhile that I must make myself some kind of tissue case to put in my backpack/shoulder bags/handbags, as I hated the way the tissues I carry around for any time of need get so rumpled and ripped and grubby before they're even used. I did a little googling and reading up on how to make tissue cases, and found that they're super easy to make. While I was planning to make a few for myself, I thought I might also make a few out of the umbrella canopies, if I had enough canopy left once I was done with the tote bag and manicure case projects. Again, umbrella fabric is waterproof, and should be ideal for keeping tissues clean and dry.

I did indeed have a little umbrella fabric left, so I whipped up the tissue cases you see above. (I used this tissue case tutorial, and then this tutorial on how to inter-fold the tissues.) The Burberry tartan tissue case (top left) is lined with more of the black walking umbrella canopy, and I shall give it to my sister when I give her tote. The other tartan tissue case (bottom left) is lined with another piece of the white nylon lining I used for the vanity cases, and I'm going to give that tissue case to my mother. Then I made two more tissue cases for me, the first (bottom right) from a remnant of jacquard decor fabric I had used for lining a handbag in 2018, and the second (top right) from remnants of brown vinyl and coppery brown satin lining I used to make a handbag in 2017, so I have tissue cases to match two of my handbags.

I think the Burberry tartan case is the nicest case of the four. The brown vinyl one is the one I am most dissatisfied with. I couldn't press the vinyl properly as the heat from the iron would have ruined it, and because of that, the top edges didn't come out even. This is a project that requires a fabric that irons into crisp folds. Oh well, it'll certainly do for now.

And that was the tale of three broken umbrellas, and how I used them to make three separate small presents, and to upgrade my manicure kit. Now the next time I see some poor, broken umbrella lying abandoned by the sidewalk in the rain, I may have to resist the urge to bring it home and show it some love.

Monday, February 10, 2020

A Valentine Jewelry Set


Carnelian is one of my favourite gemstones (the others being peridot, opal, aquamarine, and turquoise). There's something so warm and satisfying about it. I have an antique carnelian Art Nouveau-style gold ring and a heart-shaped carnelian pendant on a gold chain that I love to wear. Years ago I bought a secondhand necklace of carnelian chips/beads, combined with worn gold-tone beads, online. It was shakily assembled, so I restrung and reworked it slightly with new gold tone beads, but I was never happy with it. I did it a second time with brass-tone beads and still didn't like it much. For its third re-working I decided I'd get rid of all the metal beads and just go with red beads in different sizes and shades. I bought one string of dyed fire agate beads at Michaels with a 55% off coupon, and then a second necklace of varied plastic red beads at Value Village, took both necklaces apart, and went to work. (I thought I took a photo of that thrift shop necklace, but if I did I can't find it.)


And here's the result, which I am quite happy with. These pieces are a mix of carnelian chips, carnelian beads (the larger red beads you see in the necklace and earrings), dyed fire agate beads (the large golden orange beads you see in the necklace and earrings), small red plastic beads (such as the ones in the bracelet), and red plastic seed beads (used as spacer beads).

I love the play of all the shades of red. I like the look of chips separated by spacer beads. I had plenty of beads to work with and liked the necklace, which I made first, so much that I made earrings too, and a week later began thinking that maybe I'd also like a bracelet. I still have more carnelian chips and red beads left, but am out of body parts I'd care to decorate with such pieces.:)

As long as this project took, I now have the perfect pieces to wear on Valentine's Day, and just in time.

Smart Stripes & Science


In January 2020 my first knitting project of the year was a sweater for my grandnephew Bug's seventh birthday.


Back in the fall of 2019, when I was planning my knitting projects for the coming year, I searched Ravelry for a suitable pattern for Bug's birthday sweater, and found the one you see in the photo above, Seashore Stripes, which is a Drops design. There's something so pleasing about the stripe arrangement and, rarely for me, I decided to make the sweater in the sample colours, or as close as I could get to them. I visited Romni Wools in December and bought yarn for three projects, and one of them was Bug's. I went with Cascade Yarns 220 Superwash in gray, off-white, Navy, Really Red, and Turtle. The colours were all a really good match, except for the green, which is slightly brighter than the grayish green in the sample, but it went with the other colours well enough. 220 Superwash is a worsted yarn rather than the Aran weight the pattern specifies, but one can correct for that by knitting a design with needles a half size larger than the pattern calls for, in this case a 5 mm rather than a 4.5 mm.


And here's the finished product. It was quite a straightforward knit and I was done in two weeks. The one design change I made was to knit the bottom and cuff ribbing in navy rather than in gray as the in the sample. This saved me money because I was able to get this project done with just one skein of gray (and to subsequently return the other gray skeins I bought for store credit), and I also had less left navy yarn left over. I made a mistake on the sleeve stripes, but I don't care -- it looks just as nice the way I did it. I'm pleased with the result: it's both classic and smart.


At Bug's age, he doesn't care much about clothes, so I bought him a couple of items he'll be much more interested in. He likes to read but prefers non-fiction to fiction, and is interested in science, so I bought him a couple of children's National Geographic books, and also a toy kaleidoscope. I'm sure nothing depicted here will go over as big as the whoopee cushion I gave him for his fifth birthday, but Bug should be happy enough with his present.