Tuesday, May 11, 2021

The Lovely Orchard Quilt


Last year, when I had a lot of Thinsulate to use up, I made a Coronvirus quilt. When I finished that queen-sized quilt, I estimated that I had enough pieces of Thinsulate left to make a 4' x 6' quilt, and I decided I'd make that second throw-sized quilt up for my friend Lindsie's daughter -- my honorary niece, Olivia -- as I thought she would enjoy having her own special little quilt that was made for her by her Auntie Beth. And after all, she has outgrown the last blanket I made for her

In April 2021, after I finished Olivia's dress and purse for her 5th birthday, I decided I might as well get the quilt out of the way too, so I got out the Thinsulate and my fabric. The fabric I chose for this project was the one you see in the photo above. It's called Lovely Orchard, and was designed by Suling Wang for Camelot Cottons, and I was very taken with it at first sight. This quilt will probably last at least ten years, so I didn't want to use a cutesy, juvenile fabric for it, but rather to choose something that would both appeal to Olivia now and that she could grow up to. This simple, pretty print seemed to fit the bill. I like that the fabric is probably going to prove very much to Lindsie's taste too -- she has contemporary taste and especially loves the Japanese aesthetic, which this print is similar to. I'd hate to saddle her with something she considers an eyesore and that will be in her house for years to come.  


The finished quilt. It turned out very well and I am pleased with it. The 42" x 79" size was not quite what I had expected at the outset, but it will do. It can be used as a blanket on Olivia's single bed.

Making the coronavirus quilt felt like a herculean effort and it took me ten months to take the project from start to finish last year, though of course I wasn't working at it at all regularly during those months, but only in starts and fits. That wasn't at all my experience this time. Olivia's quilt took me just thirteen days start to finish, and I worked at it an average of two hours a day. On day one, I pieced the leftover pieces of Thinsulate together, cut two lengths of the print, and pinned the layers together. On days two to eight, I stitched the body of the quilt in vertical lines a half-inch apart. On day nine, I prepared the binding and squared the quilt by trimming the edges evenly. On day ten, I machine stitched the binding in place, flipped it over and pinned it to be hand-sewn on the other side of the quilt, and began the hand sewing. On days eleven through thirteen, I did the remaining hand sewing.  

The whole process was so straightforward and unproblematic that it amazed me. When I was making the first quilt, I struggled a lot with having to laboriously rip out lines of quilting because the fabric had puckered or folded on the underside. That never happened while I was stitching the body of this quilt -- not even once. Of course, this was an easier project because it was far less work. The coronavirus quilt had a finished size of 78" x 83.5", its quilting lines were 3/8" apart, and I put in over 240 vertical lines of stitching into its body. This quilt has a finished size of 42" x 79", its quilting lines are 1/2" apart (or a hair less), and I think there were 92 vertical lines of stitching in it. This second quilted blanket required not only well under half the actual sewing of the first, but was also far lighter, which made it considerably easier for me to physically control the fabric as I ran it through the machine. But I think the experience I gained in working on the first one contributed just as much to making this second project go so much more smoothly and efficiently. I knew exactly how to hold the quilt so that it wouldn't pucker on the underside, and there was no months' long stall of the project while I put off the task of binding the finished body because I was intimidated by the prospect of  learning how to make binding and put it on. 

When I finished the coronovirus quilt, while I knew I would be making the second smaller quilted blanket for Olivia in order to get that Thinsulate used up, I thought I would probably never make a third. Now I find I'm open to making another quilted blanket at some point. I've had that coronavirus quilt on my bed since last October, and I have been so grateful for it all through Toronto's 2020/2021 winter weather. One of my physical quirks is that I am extraordinarily cold resistant during the day -- strangers sometimes approach me on the street, look significantly at what I'm wearing, or rather not wearing, and say, "Aren't you cold?!" -- but that seems to change radically as soon as I get into bed at night, when I turn into some kind of freak icicle-human hybrid. Before this past year, during the winter, I would have on my bed a top sheet, a quilt, two wool blankets, a fleece blanket, and a duvet in a velvet cover... and it still wasn't enough to keep me from shivering miserably. During the coldest months I would have to spread on top of my duvet not only the afghan from the foot of my bed but also the afghan from the guest room and the faux fur throw and woven throw from the living room couch. This year I had on my bed the top sheet, the old quilt, the new coronavirus quilt, two wool blankets, and the duvet, and sometimes the afghan from the foot of my bed, and that was sufficient. The fleece blanket remained on a shelf in the linen closet and the guest room afghan and living room throws stayed in their places. In other words, that one lightweight Thinsulate quilt took the place of four other layers.       

Now that I know I am confident I can turn out a quilted blanket in such good time, and that a Thinsulate blanket is an excellent thing to have, I am open to making more in future, should I have need for another quilt for my household, or want to make one for a gift. Twenty-six hours of work does not seem to me like an unreasonable amount of effort to put into such a practical item that will last a decade or more. 

I'd originally planned to give Olivia the quilt as part of her Christmas 2021 present, but when I finished it in time for her 5th birthday, which is today, I decided it would become part of her birthday present instead. Of course the rest of her birthday present was more geared to the tastes and interests of a 5-year-old girl than this quilt is. Childless old maid as I may be, I'm not so out of touch as to think a child her age is going to find a quilt an exciting birthday present.   

I have something like 1.3 metres of the Lovely Orchard fabric left, and I've tucked it carefully away in my remnant fabric drawer. I don't have a plan for its use yet, but knowing me I am sure inspiration will strike at some point. And I'm looking forward to working with such a charming print again. As for the Thinsulate... I have just two small pieces left, and they've been tucked away in my drawer of interfacings and linings. Maybe I'll make a pair of mittens out of them sometime. 

Something to Wear, Something to Read, Something to Play With


My honorary niece Olivia turns 5 years old today, and of course this momentous occasion called for a present. My formula for her gifts is "something to wear, something to read, and something to play with". Let's begin with the something to wear.


I wanted to make Olivia a dress, and I searched for a nice summer dress pattern for her until I found this adorable little sundress pattern (Butterick 3477, View A), and another pattern that I liked just as much. I wavered between the two, but the sizes on the sundress pattern ran only to size 5 while the other design came in larger sizes than that, so that settled it. I ordered both patterns, with the plan that I would make the size 5 sundress this year and the other pattern for Olivia's sixth birthday.  


I had some difficulty finding two fabrics that worked together, but I eventually settled on this pink rosebud print and green polka dot combo. I love pink and green as a colour scheme, and this combination has an especially fresh, pretty, spring-like appeal. The dress itself was quite easy to make and worked up very quickly. I'm pleased with it.  


Then came the all-important matching purse. I used Vogue Pattern 9893, View F for that -- I've had that pattern for many years now and used it lots of times. As to the trim, I had a piece of very crumpled green ribbon and a slightly damaged length of pink ribbon in my ribbon cannister that I thought would do for finishing off the purse. A steam pressing restored the green ribbon to good as new, and the damage on the pink ribbon ceased to show once the ribbon was made into a pink satin rosebud. Dress and purse together made the "something to wear" component of the present. 


As for the "something to read" and "something to play with" part of the gift, I bought Olivia a thrift shop copy of Beverly Cleary's Ramona the Pest, a dollar store colouring book, and a dollar store coin bank that is shaped like a big cupcake. I think coin banks make a good teaching tool for children, and can help them learn how to manage/save money, and this particular coin bank is super cute. I put a toonie in it to help Olivia get the idea.  


The gift as a whole (er, except for the quilt). Not a bad set up for a 5-year-old's birthday, I think.   

Sunday, May 9, 2021

Brave New Bag

In the fall of 2020, I faced the fact that my beloved Everlane backpack that I had been using nearly daily since I bought it in late 2014 was getting so much the worse for the wear that I was embarrassed to be seen with it. One of the snaps that fastened the top flap was broken, and I couldn't find any snaps of the right weight to replace it. The bottom was ragged. The canvas that formed the body was dirty, and though I would try to spot clean it, that wasn't doing the trick, and, as the bag had leather trim, it wasn't feasible to dry clean it. (When I made inquiries, the dry cleaner told me it would cost $100 to have my $75 bag cleaned, and that they couldn't guarantee the results.) I came up with the idea of taking the backpack apart and using it as a pattern to make a new bag, for which I could use all the buckles and leather straps and trim from the old one. My inability to find replacement snaps stymied that plan. I still hope to eventually find a way to remake my old Everlane backpack, but in the meantime, I needed a presentable bag for everyday wear. It was time for a new bag.

With all the shops closed for in-store shopping, I searched online. I soon learned for the first time that there is such a wonderful thing as a convertible bag, which is a bag that is designed to "convert" from backpack to handbag and vice versa as desired, via a simple adjustment of the straps. O brave new world, that has such bags in 't! I do need a backpack. I do a lot of walking and lugging stuff around because I can't afford even to take public transit, let alone keep a car. I also have chronic fatigue issues, and carrying things in a backpack is so much more ergonomic than carrying them in a handbag, and tires me out a lot less. However, I am 47, and I don't really like wearing a backpack all the time like some kid. And while a backpack is what I want when I have serious distance to cover or things to carry, when I'm actually at my destination, I prefer a handbag, as it's easier to access my wallet and other things I might need. It's also easier to keep my eye on my bag when it's a handbag that is beside me rather than a backpack that's behind me. In March 2019, some SHITHEAD stole my wallet out of my backpack while I was shopping in Value Village on one particularly crowded sale day, and I want to be sure nothing like that ever happens to me again.

A convertible handbag would allow me to have either a backpack or a handbag whenever I wanted it. It's the spork of handbags. I toyed with the idea of making one, but soon decided that it would be difficult to find the right kind of buckles and straps and zippers and other bits I needed. And the bag I eventually bought -- which of course is the one you see depicted above, in both its handbag (on the left) and backpack (on the right) modes -- was just $38(CDN). It is extremely unlikely that I would have been able to make a similar bag for $38 or less.

The bag I bought was just what I wanted. I liked the look of it, and it was so practical. It had two zippered outer pockets, and several more compartments and two more zippered pockets on the inside. It goes with the dark brown yoga pants and hoodies I tend to wear for around home and running errands, and also with somewhat nicer but still casual clothes, such as jeans or a khaki skirt or a jersey dress. It goes with both my dark brown and caramel leather shoes. It doesn't go with dressy clothes, but of course I have other purses and handbags for those outfits. So this isn't a post about how I made a new bag, but rather a post about how I assembled the things I needed to go into it, which felt like a project in itself, and I did make some of those things. 

While I was waiting for my new bag to arrive, I began to plan what I was going to put in it, and where in the bag it would go. One of the upsides of being 47 is that I know exactly what I want and need in my bag, so it wasn't so much a question of what items I wanted to put in the bag as whether I had the right versions of those items. I wanted all the contents of my bag to not only stow away neatly, but to also be attractive enough to be a pleasure to use and to coordinate with the bag itself. 

First I made a list of all the things I keep in my daily wear bag (you don't see a cellphone on there because I don't have one):
  • wallet
  • keys
  • a small notebook and pen
  • my planner (usually)
  • camera (sometimes)
  • a measuring tape
  • a folded tote bag
  • compact umbrella
  • sunglasses
  • cough drops
  • tissues
  • a water bottle (in summer)
  • a vanity case containing a manicure kit, compact, pill box, hand lotion, lip balm, hair pins, a comb, and tampons 
I did indeed have all these things, but while some the things I already had would go perfectly well with the new bag, in some cases I decided it was time for an upgrade.


This is my brown leather wallet. My sister gave it to me for Christmas 2019. Alas, it turned out to not have a zippered compartment for change, even though its online product description had said that it did. I got a 7" brown zipper out of my zipper box and sewed it in myself, by hand. I was pleased with the outcome. I don't think anyone would ever guess that the wallet didn't come with a zipper.


Between 2006 and 2020 I had a keychain that was a brown leather fob. It had become the worse for the wear in those fourteen years, and I decided I was justified in treating myself to a new one. I searched online for a keychain that both appealed to me aesthetically and had some sort of symbolic meaning for me. I searched for "swan keyring", and "Art Nouveau keyring", and probably some other things, and waded through all the search results for every term I tried before I came across the one depicted above, which is a Celtic tree of life keychain. This is a symbol that's developed a lot of appeal for me over the past several years, as it reminds me that, though I am aging, I can remain strong and fruitful and keep growing for as long as I live, as trees do. It's also beautiful.


I have allergies and need to make frequent recourse to tissues and cough drops when I'm out and about. Tissues get dirty and crumpled before they're even used if they're stuffed into a bag unprotected, and I didn't like the ugly plastic bag my dollar store cough drops come in. I made a set of two tissue cases (they only hold six tissues each) and a little snap pouch, all out of supplies I had on hand. Ordinarily I'd put the tissues and the cough drops in my vanity case, but I need them too often and too suddenly to want to be bothered getting them out of the vanity case, which goes inside the bag. So, one of the tissue cases I made went into my vanity case, and the other
 tissue case and the cough drop case go in the front pocket of my bag with my keys, where I can get at them quickly and easily. 


In the back outside pocket of my bag, I carry a little notebook and a pen for those moments when I need to jot something down right away. The notebook was a dollar store purchase, and it's such a lovely little thing and such a perfect accessory for this bag that I almost hated to write in it. Where was I ever going to find another as nice? I went back to the store and bought two more of these notebooks, so I won't have to worry about finding another perfect little notebook for my bag for quite some time.   


This is my ARC planner, with the pen -- a refillable wooden one made for me by my father -- that I keep in its pen slot. I've been using the ARC system since 2013, and am still so glad I discovered it. It was the good-looking, durable, customizable, re-fillable  planner I'd been looking for for since I was a teenager. I did run into one snag in that Staples Canada doesn't carry the annual calendar refills that make the system useful, but I got around that, first by making arrangements with one of my American friends to buy and ship me one every year, and then in late 2019 I invested in an ARC hole punch, made a set of laminated monthly tab dividers, and began printing my own refills. So even this planner is partially handmade. And of course, it goes with my bag.


I have a digital camera, and when I bought it some years back, I hated the ugly case that came with it. I soon got this $3 PVC cigarette case to keep it in instead. My camera is not actually in the case in this photo for obvious reasons, but it fits in perfectly. 


I like to keep a measuring tape in my bag for measuring my knitting project if I have one with me, or sometimes possible purchases, to be sure they'll fit in the space for which I intend them. The measuring tape I had been carrying with me was an ordinary white dressmaker's tape. It had become grubby and tatty looking and I had always found it a pain to wind and tie it into a tidy coil, especially given that it would never stay wound up. I searched online and found this little number, which retracts automatically when its centre is pressed. It's both aesthetically and functionally perfect for my bag. The old measuring tape went in the odds and ends drawer in my kitchen, where it has already come in handy a score of times.


My compact umbrella, and folded tote bag in its case. I like to routinely carry an umbrella to use in case of rain, snow, and sometimes as a sunshade, rather than checking the weather forecast before I venture out. This umbrella was such a find. I like a dark brown umbrella, and they are hard to come by as black is the standard. I would occasionally find a cheap brown one, but it would never last long. Sometimes I'd buy a $3 umbrella at Dollarama and it would break the very first time I used it. Then nearly two years ago Dollarama got in a lot of excellent quality automatic umbrellas in assorted solid colours, one of which was brown. For $4, it was a wonderful score. (Pro-tip for Dollarama shoppers: The most they ever charge is $4 per item, so their $4 items are the ones to keep an eye out for, as they are the most likely to be underpriced.)  I went to every Dollarama within walking distance and bought every brown umbrella they had, winding up with five of them. Nearly two years later, I am still using the first one and it's in perfect condition, so I'm not likely to have to scour the market for a new brown umbrella anytime soon.

I like to carry a tote bag in my bag for those extra items that won't fit in my bag, such as library books or purchases. I didn't much like the old brown with white polka dots tote bag I had been keeping in my backpack. I sewed a new, more stylish-looking tote bag to keep in my daily wear bag, and also made it a matching case. The tote bag would never have stayed neatly folded up in my bag, and it would have tangled with other things and been a pain. The case will keep it neat and clean and compact. The case needs a snap, but I didn't happen to have the right kind of snap on hand and can't easily get one right now. I'll just use the tote case the way it is until Fabricland reopens for instore shopping, much as it pains me to see it not quite finished and perfect [twitches].  I've reassigned the polka dot bag to a new job -- plastic bag holder -- and it hangs on a knob in my back kitchen.


The tote bag is a dark brown nylon on one side, and a lighter brown check on the other. It's a reversible bag, so I'll be able to use whatever side looks better with my outfit. This bag has such a nice stylish shape, too. I made it according to the pattern in this excellent tutorial. I've made this type of bag before and am certain I will make another at some time in the future. 


This is my vanity case. It's Ralph Lauren product. I've had it for at least seven or eight years. I bought it from Winners and it shocks me to think how much I paid for it -- I'd never pay that much for something I could so easily make for so little now. However, what's bought and paid for and used is... bought and paid for and used, and it at least seems to be holding up, and it goes with my bag. 


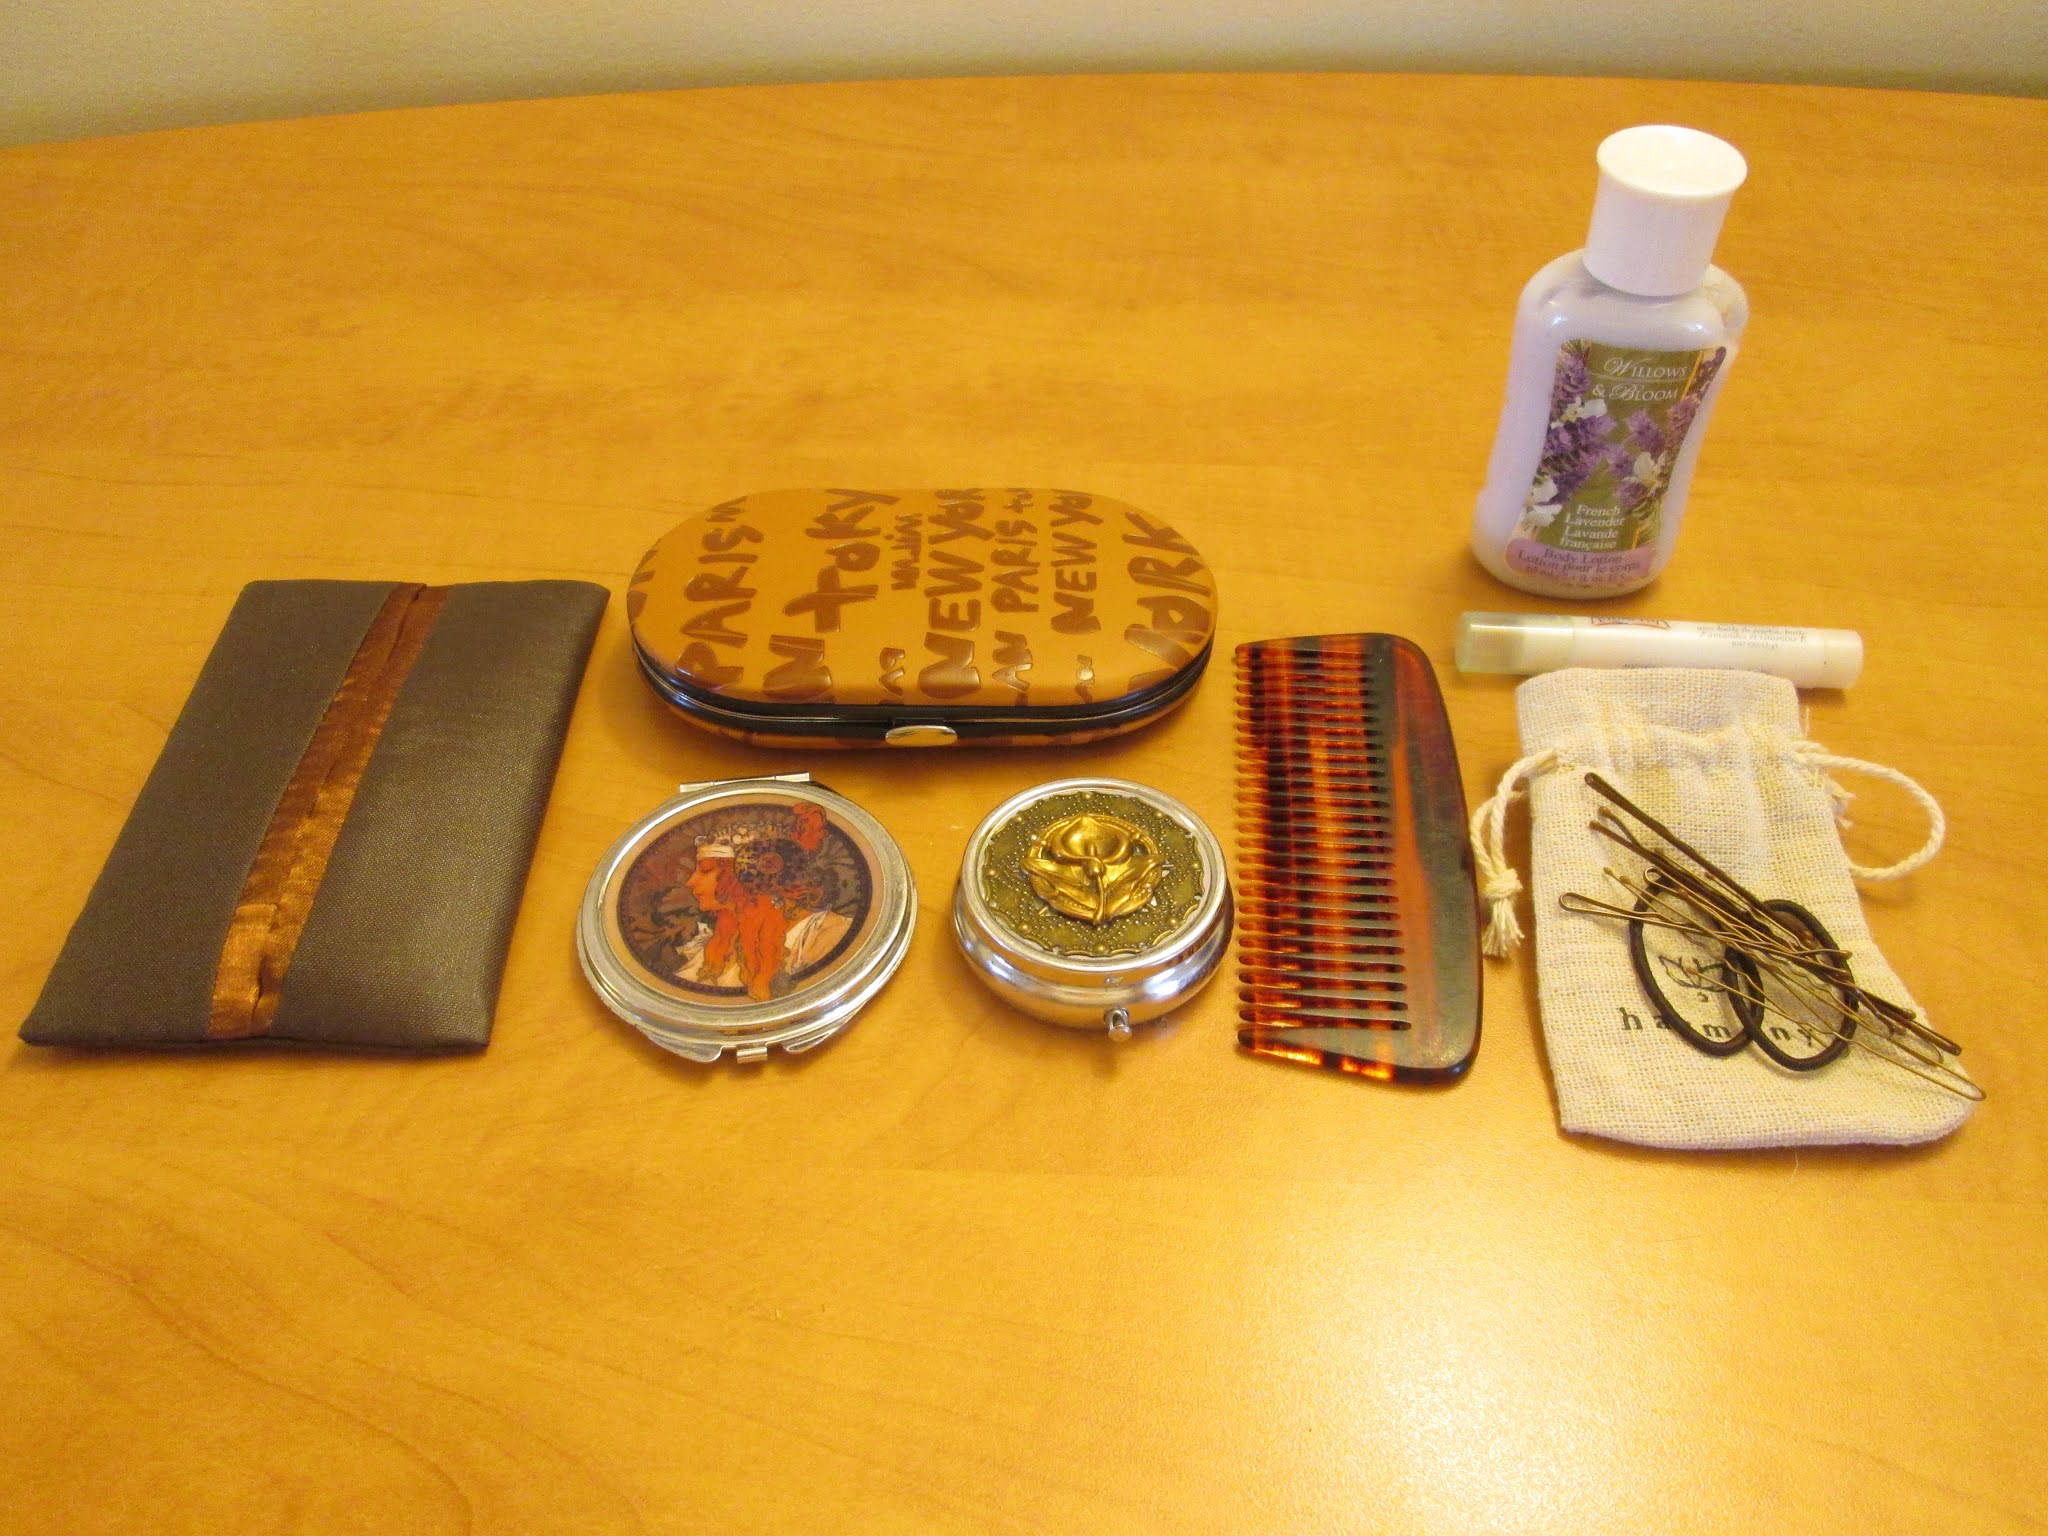
The contents of my vanity case. From left to right: a tissue case, a manicure kit, a mirror compact, a pill box, a comb, hand lotion, lip balm, hairpins and a couple of hair elastics, and little drawstring bag to keep the pins and elastics in. My old dollar store manicure case was falling to pieces, so I splurged on a new dollar store one that's much nicer and better equipped than the old one ever was. All the other items I've had for years. Not shown are the tampons, and no, I haven't sewn them little velvet or satin tampon cases so that they'll go with my convertible bag or anything ridiculous like that. Even I have my limits when it comes to obsessive coordination.


My little pill box, which I can't resist showing. Not that it holds anything exciting, alas -- just ibuprofen and allergy meds. 


My Art Nouveau mirror compact. I ordered this from Etsy many years ago, and still love it. I have a bit of a fetish for compacts, and also have a vintage gold tone one, and contemporary silver tone one with my initials engraved on it, but I tend to only get those out when I'm getting very dressed up, while this is the one I use for every day.


My water bottle. My old one was a freebie blue plastic number from a company I used to work for. This is a new one, and it's just a Dollarama purchase, but it's lovely and sleek and a definite upgrade.

Not shown (at least so far -- I'll probably update later on) is my sunglasses. My eyeglass cases look kind of beat up, and I'm going to keep an eye out for nice ones at the dollar store and thrift store when things open up again.

I'd also like to add a word about bag weight. Decades ago, I read in a women's magazine article that, according to medical recommendations, women shouldn't carry a bag that weighs more than 5% of their total body weight. The writer had taken a scale around to all the offices/desks of all the women she worked with, and done an on-the-spot weigh-in of their bags. As I recall, everyone's purse was over the limit, but the prize winner was a bag weighing in at a grand 26 pounds. Good heavens, the woman who owned that bag was carrying the equivalent of a toddler everywhere she went! (Not toddler-ist.) 

It's important to keep your daily use bag as light you reasonably can by editing it so that you're only carrying the most lightweight versions of what you'll realistically use. With modern life requiring the kind of paraphernalia it does, probably many women aren't going to be able to keep their bag to under 5% of their weight, but under 10 pounds seems like a reasonable goal for most women. I've done a moment of truth weigh-in with my bathroom scale, and I'm reasonably satisfied that my bag weighs in at 9 pounds even when it contains my planner (1.6 pounds), camera (0.4 pounds), and full water bottle (2 pounds), which I don't always carry, and a svelte 5 pounds without those three items. 

I've been carrying my new bag since December 2020, and gradually replacing a few last things since then, and I am very happy with it on the whole. It is smaller than my old backpack, which was so handy for bringing home groceries as it easily held a bag of milk plus some other things, but then again I may still eventually redo the backpack. 

Otherwise, I love my bag and all its little accessories. It is such a delight to have just the right bag with exactly what you want and need in it. Even my keychain gives me pleasure whenever I use it. My bag wouldn't suit anyone else, but then that was the point of this endeavour: to use my knowledge of myself and my skills and tastes to assemble a bag that was exactly right for me

Thursday, April 15, 2021

Spool School


The process of buying thread has long been a source of frustration for me. The most efficient course of action is to buy thread for a project when I'm buying the materials for it, but whenever it came time to pick out thread from the rainbow-like array of spools in Fabricland or whatever other sewing supply store I am shopping in, I was always tormented by the thought that I might be buying thread I already had on hand. Good thread is not cheap, and some stores won't allow returns on thread. It wasn't so bad when I had a Fabricland a fifteen-minute walk from me (oh, those halcyon days!): I would buy fabric, check at home to see what thread and other notions I had on hand, and then make a second trip to buy whatever items I was lacking. But now the closest Fabricland is 7.6 km from my house, and getting there and back requires two hours (it's a long walk and a slooooow bus ride each way) and two bus fares, which means a second trip is not viable. Because I always plan my projects in advance and have a pattern picked out for them, I know what notions I need and can check my supplies to see what I have that might be suitable before I go fabric shopping, but when it comes to thread I have to buy what I think I need and hope I'm not wasting money on something I already have at home.

Recently, instead of just getting frustrated by this, I decided to take a hard look at this problem, and to think about what I could do to address it. It isn't possible for me to remember precisely what thread I have on hand, so what memory aid could I use? My first thought was that maybe I could take a photo of my spools of thread and then compare the fabric I bought to the photo, but as everyone knows, photos aren't always colour accurate, and that wouldn't ensure a good colour match.

Then it dawned on me: if I created a thread catalogue in Excel, and took that spreadsheet with me whenever I went fabric shopping, I would know exactly what threads I had and what I needed to buy.


I sat down yesterday morning with my entire collection of 47 spools and 8 cones of thread on the surface of the desk before me, and set up that Excel spreadsheet, a portion of which is screencapped above. I made a list of my thread cones first, and then one of the few specialty threads I have on hand, such as the one spool of elastic thread and one spool of upholstery thread, and then I made a list of all my general purpose thread spools. For each spool I had, I came up with a description of the colour, recorded the brand name and shade number, and then did my best to estimate how much thread remained on the spool. In a few cases the sticker was gone from the spool and I didn't know what the shade number was and had to put a question mark in its place, but happily that was only a few spools. 

While I was at it, I arranged my spool rack by colour, and with the shade number sticker up, as that will make it easier for me to select the thread I want.    

(You may notice that entries 22 and 23, which are for a "dark forest green" and a "medium forest green" respectively, have the same shade number. That is not a mistake. The spools so described really are two distinctly different shades of forest green. I'm theorizing that either the fact that the darker one is general use sewing thread while the lighter one is glacé finish cotton has affected the appearance of the colour, or, less likely, the darker thread being a very recent purchase while the lighter one was bought long ago, that the shade has been changed over the years.)   

It didn't take so very long to set up the spreadsheet, and now I'll just have to take a minute to update my thread catalogue every time I buy new thread or finish a project, and remember to take a print out of it with me every time I'm going fabric shopping. I don't have a cell phone, or I could just load the list onto my phone and refer to it on there. With that updated spreadsheet in hand, I can make a very informed decision as to what thread I need. I was so pleased with this idea that I decided to write a post about it in case the idea might be useful to anyone else.  


I have a few more thread inventory management tips to share. One, if you do a lot of sewing, it may be worth buying cones in a few basic colours, or in colours you like a lot and tend to work with often. Cones are less expensive than spools, you can rest secure that you won't run out mid-project, and thread keeps indefinitely. I like to keep cones on hand in black, white, brown, ivory, red, and navy. I've been through at least a few cones in each colour in my more than two decades of regular sewing. I also have cones in charcoal and bright pink that I bought nearly 20 years ago when I had one project to do in each colour and I happened to see the cones on sale, and buying those wasn't a good idea. I don't wear gray or pink at all, and am unlikely to ever use them up.

Which leads me to my next tip: if you have a very small amount left on a spool, or a colour of thread you used for just one project and are probably not going to ever need or want again, use that thread for basting. Basting with a contrasting colour of thread you will never otherwise use will make your "good" thread go farther, and it will also make it easier for you to see, and remove, your basting threads. 

Besides my 32-spool rack pictured at the top of this post, I have a small cardboard box where I keep most of the rest of my spools, which have been designated as basting thread. I've been using my designated basting threads system for a year or two, and I'm gradually whittling my spool collection down in size. Eventually I hope to have all my spools fit on the rack. A collection of 47 spools and 8 cones does take up more room than I would like.

And my final pro-tip regarding your thread collection management: don't let your cat have unsupervised access to your sewing area. My Trilby loves to play with spools of thread. And they must have thread on them -- I have tried to give him empty spools to play with, and he had no interest. No, his spool play has to involve inconveniencing or exasperating me in some way.

One time Trilby managed to get a spool so wound around every item in the attic that it must have taken me 10 minutes to wind it back up again. On one other occasion, I spent 25 maddening minutes looking for a spool of taupe thread that I knew I had on my sewing table and just couldn't seem to find though I'd looked in every conceivable place that I could have possibly put it. Finally I gave up and bought a new spool of thread in that colour, only to find the first one under the plant stand I had in the kitchen when I was vacuuming a few days later. Trilby had chased that spool of thread down the attic steps, along the second floor hallway, down the main staircase, along the first floor hallway, and into the kitchen, before ultimately getting the spool stuck under the plant stand. This is why I now have two spools of taupe thread in my basting thread box, and why Trilby is not allowed to be in the attic by himself. 

Don't even get me started on Trilby's fetish for pearl-headed pins, as that is beyond the scope of this post.

Monday, April 12, 2021

Daisies for Cauliflower


My grandniece Cauliflower will be turning 12 this August, and of course such an occasion calls for a sweater. 


I searched Ravelry for a suitable pattern and found the Daisy Delight sweater pattern, and the coordinating hat pattern you see pictured above. They are Drops designs, and available for free. In March 2021, when the stores in Ontario were briefly open, I went to Romni Wools on Queen Street and bought 450 grams of Drops Karisma in Rose (shade # 80). I had some cream Drops Karisma DK left over from another project that I decided to use for the daisies, and a little Jamieson's of Shetland DK in Leprechaun (shade #259) left over from this project that would do for the daisy centres -- the sweater pattern requires just two rounds of the daisy centre colour. 


Here's the finished sweater, in a size 11/12. It knitted up in just a few weeks and with no mistakes to speak of. I'm reasonably pleased with it.


Here's the hat. It turned out fine too. A matched sweater and cap set is such a cute look on a young girl. 


It's not much fun for a kid to get a wool sweater in August, so I threw in a few little inexpensive things from the dollar store and thrift shop that Cauliflower can use right away. The item on the left is a planner with stickers, the item on the right is a temporary tattoo kit, and the item above is a little owl ring I found in a thrift shop. 


Cauliflower has thing for owls, and one can't beat a cute ring like this for $2. I just hope it isn't too big for any of her fingers. It fits my ring finger, which means it's a size 7, it can't be sized, and Cauliflower is smaller than average for her age and is unlikely to ever have hands as large as mine. Well, maybe it'll fit on her thumb for now, and eventually on her first or middle finger. 


The entire gift. Not too shabby, and I hope it's cool enough to suit a 12-year-old. It's going to get harder to please Cauliflower from here on in, as she'll be developing her own tastes and becoming more conscious of what's "in". 

I had 25 grams of the new dusty rose yarn left, and used 23 grams of the cream yarn and 2 grams of the green yarn that I had on hand, so when it came to calculating stash increase/decrease for this project, I broke even.  

Thursday, February 25, 2021

Gift Wrap, Take Two


Back in 2017, my friend Christine gave me two skeins of yarn she had bought at Pembroke Farm, Prince Edward Island, while she and her family were in P.E.I. on vacation the summer before. I was quick to knit up most of the yarn into a shawl/wrap pattern. But then I found I had knitter's remorse on two counts. One, the shawl seemed to be such an awkward shape and length that I didn't like wearing it very much. Two, I had 60 grams of the yarn left over, which was not enough in itself to make anything, and I couldn't seem to find any yarn that coordinated with it. In 2020, I decided to take the wrap apart and knit a rectangular scarf that I would like better, and to use one with a repeating pattern that I could just knit until the yarn was gone.  


I searched Ravelry for a suitable scarf pattern and found the Duo Columns Reversible Scarf, designed by Quenna Lee. It's a nice-looking design, and is available for free. 


Here's the finished scarf, with both its sides on display. I thought this scarf design would look better fringed, and as I had plenty of yarn to work with, I went ahead and did so. When I had near the length I wanted, I stopped knitting and fringed the cast-on edge, cut a second set of fringe lengths and set them aside, and then resumed knitting on the length. I worked until I had just enough to cast off with, finished the scarf, then added the fringe to the cast-off edge, with the result that I had no yarn left over. 

The completed scarf is 82" long, which is longer than I would normally make a scarf. I usually like them just worn singly around my neck, with the ends reaching my waist. The ends of this scarf reach to my knees when I wear it a single time around my neck. 


But then this is a scarf that looks best wrapped a few times around the neck anyway. 

I don't particularly like making or wearing big needle knits, but there's no denying that they make for gratifyingly quick and easy projects. It also made me smile to use my 9mm needles. Years ago I saw them in a Salvation Army thrift store priced at $1. I knew I didn't have a pair of 9mm straights, and I stood there for a few minutes, mentally debating buying them. With money so tight, I try never to buy anything unless I am sure that I will use it. At the time, I'd never used 9mm needles 35+ years of knitting, and perhaps I never would. But I told myself, "It is just a dollar, you'll never get a better deal, and if you don't buy them and should need 9mm needles at some point, you'll kick yourself because you'll wind up having to pay a lot more." I bought the needles, and then just three months later was delighted to find that a pattern I'd picked out called for them. This would be only the second or third time I've used these needles, but I'm still smugly satisfied that I made the right call that day. 

This project used up the 60 grams I had left over when I knit this yarn up the first time, so I'm going to count this project as having a net stash decrease of 60 grams. 

Monday, February 15, 2021

The Abominable Snowman Afghan


My sister is what I call "Christmas crazy", meaning she really loves decorating for Christmas and goes all out on it, and she also has a thing for snowmen-themed stuff. A few years ago I got the idea of making her a special Christmas afghan -- something with snowmen on it if possible. 


I searched the Ravelry database for a suitable afghan, and came across the Patons-designed Christmas Eve Afghan pattern depicted above. I thought the happy-looking little snowmen were cute, and that the design had a bit of a country feel to it, which was a good thing in this case as my sister's tastes lean a little country. The afghan design is basically lap-sized with a finished size of 42" x 48", but I decided I'd enlarge it to what I consider the ideal afghan size, 4' x 6' -- large enough to comfortably cover one ordinary-sized adult, yet not so large as to be unwieldy. This meant knitting 60 blocks instead of 48. I decided I would also make a matching throw pillow.

As to the yarn, it had to be a budget type yarn, because I needed a LOT of yarn for this project (1730 grams by my estimate). I looked in my stash and found some orange worsted yarn for the snowmen's nose, while a partial skein of Loops & Threads Impeccable Tweed in Walnut Tweed (leftover from the owl cushion I made earlier in 2020 for my mother) would do for the arms and top hat. I bought one skein of Red Heart Super Saver in Soft White for the snowflakes and snowmen, and for the body of the afghan I bought Bernat Super Value in Forest Green. I did the math and calculated that I needed 8 skeins of the Bernat Super Value. In January 2020, I began walking up to the Michaels at Toronto's Stockyards shopping centre once a week to buy a skein of yarn using Michaels' coupons, which only apply to one item per customer per day. Or rather, I intended to walk to Michaels once a week; the reality was that some weeks I wouldn't get around to it or I decided I'd rather buy something else at Michaels when I actually got there, and as of the end of February 2020 I only had the one skein of Soft White and two skeins of the Forest Green. But hey, no rush, there was still lots of time to shop at Michaels before Christmas 2020 and get the rest of the yarn, right?

This blithe assumption turned out to be quite wrong, because of a little complication known as the COVID19 pandemic. Michaels Ontario had to close in March, and when they reopened a few months later, they had no Bernat Super Value worsted in Forest Green. I waited several more months for them to restock, but it turned out that they'd ceased to stock it at all. By this point, in August, I'd begun working on the afghan and was getting anxious. I searched online, and found that Michaels had some more still in stock in their other stores across Toronto that I could order online and have shipped to my house. I ordered six skeins. Michaels sent me a bag of four skeins and I called them and reported that I was two short of what I ordered. The customer service person arranged for another shipment of two, and then it turned out that I later received the remaining two that I had originally ordered in a separate shipment plus the extra two sent to me because I'd complained of not receiving my full order. I do wish Michaels had added some kind of statement to the packing slip for the four in order to inform me that I would be receiving the extra two under separate cover. But at least now I had no worries about running out of yarn.


Here's the finished afghan. It's a little smaller than I hoped (47" x 68", not counting the fringe), but it will do. I began it sometime in early August, thinking I'd be done in a few months -- I usually can knock off an afghan in one to two months -- only to find that it dragged on for a soul-searing eternity during which I often felt despairingly that I would be working on it forever. It took me over six months to make this afghan and a matching throw pillow -- I took just a week or two off in that time to knit a glove and a half for the tam, cowl and gloves set I'd begun earlier in the year. The afghan is a time-intensive design, of course, with its detailed little motifs. I did eventually get to the point that I had memorized the cabled and snowmen patterns, which helped some with speed, as I could make a block in an evening without so much as a glance at one of the charts. I was never able to do the same for the snowflake motif, and it took me several evenings to make each one. 

It still shouldn't have taken me more than three to four months to make the afghan and cushion, but then I made quite a lot of mistakes. I got a bunch of cable squares made before I realized I'd done them wrong, and I did the same thing with the snowmen squares. I made about snowflake blocks before I realized they were too wide. I think what happened was that the Red Heart Super Saver was a slightly bigger gauge than the Bernat Super Value. I ripped out all of them and reknitted them four stitches narrower than the pattern called for. They're still a little too wide compared to the cable and snowmen blocks, but it was workable. 


Seaming together the afghan blocks was a job in itself, but once that was done, I did enjoy getting to the point where I could begin working on the garter stitch trim on the four sides, because it meant I could use my brand new ChiaoGoo circular needle set for the first time. I'd wanted a new set for years. Then in early December when I realized I was going to have to spend Christmas alone (after an entire year spent alone) instead of going to my parents' house for a few days as I normally do, I went on Amazon to buy a few modest things to cheer myself up. Then I saw on my wish list that the price of this set was as low as I'd ever seen it, and I went a little mad and ordered one. 

When it arrived I sat down at my kitchen table with it and spent so long poring over its many attributes that my cat got jealous. Most of the things I buy are handmade or thrifted or even found items that I upcycle, or things my woodworker dad makes for me, and even when I do buy something new it's usually from the dollar store or some other low budget place. I generally have to go with the cheapest option I can live with. And I'm fine with that -- I think I probably get more real enjoyment out of making and contriving and finding deals than I would if I could afford to just go to the mall and buy whatever I wanted.  But I have hardly ever owned anything top of the line, and it was such a thrill to get something that is the best money can buy for once.  


This was my old, partially incomplete and partially broken set of thrift shop Denise circulars and the assorted circulars I owned prior to my ChiaoGoo set's arrival, so you can see why I was so excited. The Denise circs tended to come apart really easily. No matter how careful I tried to be, the needle would come off the line, dropping 50 or 60 stitches. I would groan and painstakingly pick them up again, and then five minutes later the needle would come off the circular line again. I'm amazed I didn't have a rage stroke. I'll give the assorted circulars to a friend of mine who has just begun knitting, but I really think the Denise set should go in the garbage. 


Here's a photo of the matching throw cushion. It is 20" x 20". The original plan was to make the cushion out of pieced blocks, just like the afghan, but I decided against going that route because it wasn't going to be possible to make the cushion the size I wanted it, and also because it was a lot of work. So, I adapted the cable pattern and used that for the cushion, knitting the cushion top in one long strip and then seaming it on three sides. It's more neutral than Christmassy, but that means my sister will be able to leave this cushion out all year round if she likes. 


The zipper for the cushion. I used my "two crochet chains sewn on either side of the zipper" technique for this as usual. I do wish I could have used a zipper in a shade that was closer to my yarn colour, but between Fabricland only offering curbside pickup shopping these days (which would make if difficult for me to match the colour) and my super tight budget, I decided this olive-coloured zipper that was just sitting in my zipper box would have to do. I made my own pillow form for the cushion. Good thing I'd stocked up on polyfil early in 2020. 

I did not finish this project until February 13th, 2021. Meanwhile, of course, Christmas had long past. My sister's birthday is in mid-January, so I gave her the items I'd originally bought for her birthday for her Christmas present (my mother and sister came to my house in Toronto to do a curbside present delivery and pickup on December 23rd), and I told her that I was working on something special for her birthday present, though I was uncertain as to when I'd be able to give it to her. I still don't know when I'll be able to see her again. I could ship it to her, but that would be expensive and I can't bear to take the risk it might get lost in the mail, and also I want to see her reaction when she opens it. 

My sister has what I would categorize as three basic reactions to gifts. If she loves the gift, she'll laugh in a particular, delighted, staccato kind of way ("Haw! Haw! Haw!"). If she likes it, she just seems pleased, and talks about how she'll use it. If she doesn't like it, she is polite but unenthusiastic and unforthcoming. Of course I won't pressure her to like this afghan and cushion or complain if she doesn't, but I'll be watching her carefully when she opens it, and if I get the "politely unenthusiastic" reaction for something I worked six months to make and that is probably the most time intensive knitting project I've ever done, I think I'll die a little on the inside.  

This project used a tiny amount of orange yarn and perhaps 20 grams of the brown tweed I had in my stash. I had 60 grams left of the white, and thanks to the mix-up with the Michaels shipment, I finished this project with two almost untouched skeins of green yarn (I used just a little of the one when I was finishing up the fringe), so that's a net stash growth of  436 grams.