Showing posts with label upcycling. Show all posts

Monday, January 3, 2022

A Calculated Project


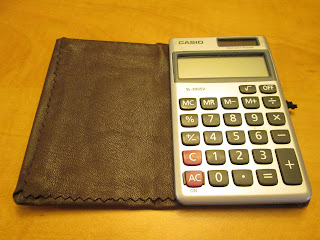
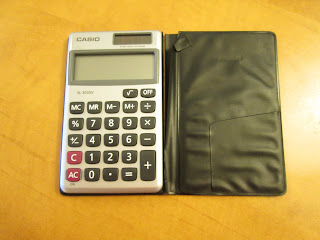
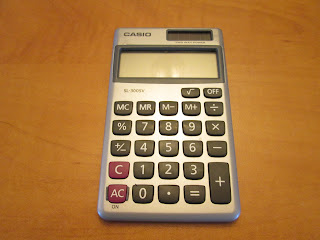
I bought the calculator you see above at the age of 22, circa 1995 or 1996, for something in the neighbourhood of ten or twelve dollars. Twenty-six years later, while the calculator was still in perfect shape and working order, its black plastic vinyl cover had become cracked and torn. I'd been meaning to make a new cover for it for awhile, but when in December 2021 I began to take my calculator with me to the grocery store every week and pre-total my groceries before checking out as a way to make sure I stayed under my grocery budget, I decided it was time to get moving on that project. I wanted my calculator to look nice if I was going to be taking it out in public, and the old cover was very close to falling completely apart. 


I did consider just using the calculator sans cover, but then I reflected that there was probably a reason that the calculator still looked perfect while the original cover was in such bad shape. Notice how the number pads are still clearly legible, and the screen is unscratched? No, the calculator needed protection from wear and tear, and must have a new cover. 


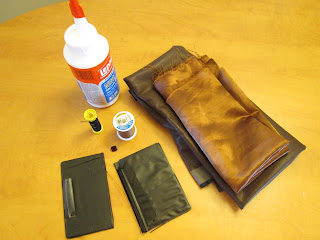
This wasn't a project I was going to find some handy tutorial online for -- I was going to have to figure it out on my own. I gathered some supplies: brown vinyl (left over from when I made a handbag), lining fabric, coordinating thread for both fabrics, glue, thread elastic, a button from my button tin (it was one I had cut off a worn-out blouse I was throwing out), and the old cover, which I could employ as a pattern.  


I laid the old cover on the fabrics and used it as a guideline to how big the new piece should be -- the pieces needed to be the size of the old cover plus a good margin that I'd be folding inwards. The piece of fabric you see in this photo was supposed to be the lining piece of the cover, but I ended up not using it for reasons that will soon be explained.


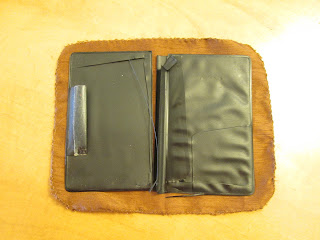
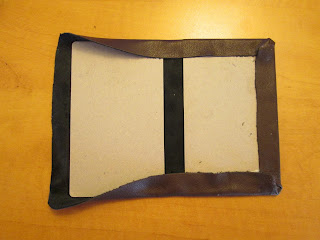
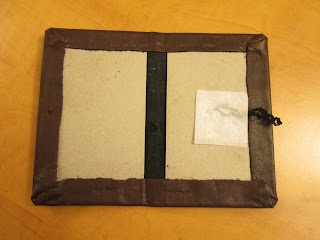
I cut the old black covers apart and pulled out the cardboard pieces that had given them their shape. Though I had planned to use the cardboard pieces as pattern pieces for new ones, they were in such pristine condition that I simply reused them for the new cover. Leaving room for the flexible spine of the cover, I placed the cardboard forms on the piece of vinyl I had cut, and folded in and glued the edges of the vinyl. 


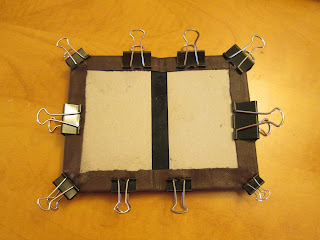
I used bulldog clips to secure the cover's inner edges until they could dry. One can't pin vinyl as it will leave holes, and it would be very difficult to pin it over cardboard anyway. 


The old cover had no fastener, and had always annoyed me by constantly flapping open. And it had always seemed so awkward to me that the spine was on the right side -- it seemed to me it should be on the left, as with a book. I decided that my cover would be oriented to flip open like a book and would also close securely. I considered a tab with a snap fastener, but eventually decided a button and an elastic loop would be my best bet. 

Vinyl doesn't hold hand stitching well -- the stitches just seem to tear out. I really should have affixed a square of interfacing to the underside of the cover piece before I glued it on to hold the button. Since I hadn't thought of that in time, I sewed the button in place by pushing my needle clear through the vinyl and the cardboard form and the vinyl on the other side and then back again, about twenty times. I had to use a thimble for this effort -- something I rarely do -- as it would have been too painful to push the needle through the cardboard with bare fingers.  


I crocheted a chain from the black thread elastic in order to make the button loop. It took me a few tries to figure out how to attach the elastic loop to the cover. Sewing didn't work as my stitches just tore out of the vinyl, and I couldn't think of a practical way to glue something so small and finicky. In the end I cut two squares of interfacing and used them to create a sort of glue sandwich that I could use to secure the ends of the elastic loop. Once that had dried, I glued the back of the interfacing square to the cover, after first testing its position to be sure it was situated properly to fasten the button.   


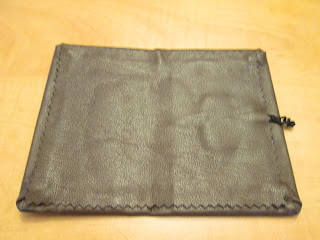
As indicated above, I'd originally planned to line the cover with a piece of satin lining. But when it proved so hard to stitch anything to the vinyl, and promised to be a time-consuming, pain in the ass, and very probably not at all successful job to sew the lining in, and I thought glue would seep through the satin lining and look bad, I opted to go for a vinyl lining. This was a much easier task, as I just had to cut a piece the right size and glue it in place. After I'd cut the piece of vinyl lining to the right size, I pinked the edges for a more finished look. 


The finished project from the inside. The calculator is secured to the back flap of the cover by three strips of double-sided Scotch tape. I hope it holds, but if it doesn't, I will probably just try some stronger double-sided tape. In the old cover, the calculator was held in place by a strip of tape, and that held it in place for 26 years. 


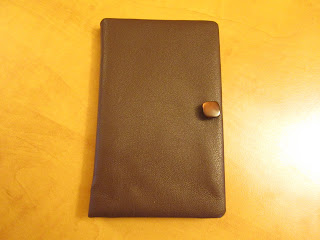
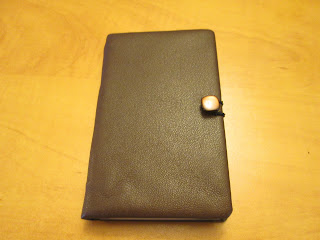
The finished calculator in all its buttoned glory. I'm pretty pleased with the result of my work on it. I don't know how long this cover will last -- I expect it to be less durable than the old one -- but now that I know exactly how to make a new one (and have documented the process, lest I forget), it'll be pretty easy for me to make another if necessary. 

I certainly like this cover better than the old one, it will coordinate well with the daily wear, convertible bag I always take to the grocery store, and this is a project that didn't cost me a penny. Can't beat that.

Monday, December 7, 2020

Makeup Case Makeover Madness


In January 2020, using the tartan canopy from an old and broken umbrella, I relined the the wicker case that I use to hold my manicure kit, and made two matching vanity cases to boot. I was so pleased with how that project had turned out and enjoyed using my upgraded manicure kit so much that I soon turned my sights to my makeup case, which you see in the photo above. I bought this case in an after-Christmas sale at Shopper's Drug Mart for $16 in 2012. It came with makeup in it, all of which I gave away unused to my sister/a friend because none of it was the right shade for me, but I didn't care. The case alone was worth the $16. It's a good-looking case that is just the right size to hold all the makeup and equipment I could reasonably want, it fits nicely into my top dresser drawer, and it isn't too big to pack into my suitcase when I travel.  

But, after eight years, it had become somewhat the worse for the wear. To begin with, the faux chrome trim was coming off on the outside on the left side. 


The lining of the case's interior had become stained and yucky over the years. But, since my manicure kit refresh had turned out so well, I was confident I could fix that. Regrettably, after that tote bag and manicure kit and tissue case upcyling extravaganza last winter, I was fresh out of broken umbrellas that could be used for lining, but it's not like I'm allergic to fabric stores. I took the makeup case with me when fabric shopping to make sure I got a fabric that would go with the brown of the shell, and ultimately bought half a metre of a dark brown nylon lining fabric at Len's Mill on Orfus Road, Toronto, for $4.33. I also bought a brown 7" zipper with the idea that it would be nice to have a matching vanity case to go with the case and help me organize it. 


The makeup case with its new lining. If you've got an old beauty case you'd like to reline, I say go for it. It's not a difficult task, though it does take some time, as it's finicky work getting everything positioned and glued just so, and one needs to do it in stages to give the glue time to dry. It's also inexpensive, as you just need a modest amount of nylon fabric, glue, and possibly some cardboard.

After getting the old lining pieces ripped out, I cleaned the case. There was dried old glue on the trim that I had to scrape and scour off, and I had to use a razor blade to scrape some of the old glue out of the interior. Once the case was clean and empty, I reglued the part of the trim that had been coming off on the exterior, and left it to dry.

I then ripped all the old lining off the cardboard forms, and recovered the old forms with the new lining. I reused all the old cardboard pieces for my lining, with the exception of the upper lid piece, which had a window cut in it for the mirror. (I chose not to put the mirror back in, as I've never used it and it's just something else to keep clean.) I had piece of scrap cardboard on hand that I used to make a new upper lid form. I gave the lining pieces a day to dry, and glued the lining back in stages, one stage per day: first the top and bottom side lining pieces, then the back wall/hinging piece, then finally the big top and bottom pieces.


When I looked at how my makeup case was organized, and figured out what kind of custom cases would help me to keep my makeup tidy and accessible, I wound up deciding to make *three* matching cases for the kit. Using the leftover dark brown nylon and some remnant lighter brown satin lining fabric I had on hand, I made a tissue case, I made the vanity case I'd planned to make, and when I found I had a second 7" brown zipper in my zipper box (bought to use in a skirt for a brown suit I'm planning on making, but I won't get to that project for months and will have time to replace it), I made a third case to hold my makeup mirror, which will hopefully protect it from getting scratched and/or dirty.


The finished and (mostly) packed case. The plastic case that you see in the box holds my makeup brushes, a ziploc bag of cosmetic sponges, and a bottle of makeup brush cleaner. In the front of the case on the left are my mascaras, eye crayon, and concealer. In the right front corner are my bottles of foundation. On the right side are my blush, contouring, and two eyeshadow compacts. The vanity case I made holds my lipsticks and lip glosses. 

I'm nearly as pleased with this project as I was with the manicure case refresh. For less than $6, I have made this makeup case better than "good as new" -- it has never looked this nice or been this conveniently arranged. All my makeup and tools are reasonably easy to see and access. When I put the lipstick case, the mirror case, and the tissue case on top of everything else and shut the lid, the makeup kit is packed snugly enough that nothing shifts around much inside and it's all in the same order when I open the lid -- unless I have a dimbulb moment and open the case upside down, that is. (Yes, it's happened. And yes, it's happened more than once.)

And now I'm inspired to get out the thrift shop makeup books I bought recently and begin working on upgrading my fairly basic makeup skills. A woman who owns a makeup kit this nice ought to be able to put her makeup where her mouth is. (Or eyes or cheekbones or whatever.)  

Friday, February 21, 2020

A Tale of Three Umbrellas


This crafting project began when I cleaned out my hall closet late last fall.


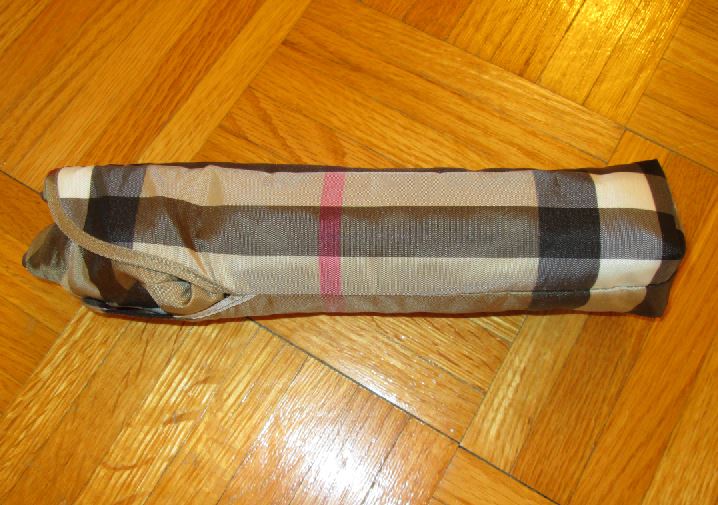
While cleaning out the closet, I came across two broken umbrellas. The compact that you see in the picture above is a Burberry umbrella that I bought via eBay years ago. It had a very frail structure that didn't last very long -- perhaps two or three outings. The walking umbrella below the compact is not a genuine Burberry, but one of the imitations one used to be able to buy in the early 2000s, before Burberry (understandably) began cracking down on the use of unauthorized/imitations of their trademark tartan. That walking umbrella stood me in good stead on rainy days for years, but eventually broke. It's impossible to find a Burberry-esque tartan umbrella now, and I can't afford even a secondhand Burberry umbrella these days, so I hated to just throw these umbrellas out. First I looked into the possibility of repairing the umbrellas... or rather the impossibility of repairing them. Then I turned to the idea of buying a new umbrella of the same size and stitching the old canopy on it, but though I kept an eye out for suitable new umbrellas for some years, I was never able to find umbrellas of the same dimensions, and had given up on that idea. I was tired of having a couple of unusable old umbrellas sitting around taking up space in my tidy closet, so I decided it was at least time to get them out of there.

I then ripped the canopies off the broken frames, threw the frames out, and ran the canopies through the wash. This redefined my challenge completely: now I had two fairly sizable pieces of no-fray, durable, waterproof, nylon fabric in an attractive tartan sitting on my sewing table. What might I do with them?

I very quickly decided I would make a tote bag out of the compact's canopy, because it would make a perfect stocking stuffer-type present for my sister who, judging from some of her pins on Pinterest, likes Burberry tartan just as much as me. I found a tutorial for a reversible lined tote bag on the net, and wondered what I could use for the lining. My sister likes black, so I thought some black nylon would work. I considered buying some. But before I could do that, I found a broken walking umbrella abandoned just outside the grocery store one day when it had been raining on and off and I was making a quick trip to the store to buy kitty litter during one of the non-rainy intervals. On my way back home, I picked it up and tucked it under one arm and carried it back to my house (along with a jug of kitty litter in each hand). I probably looked like a crazy person, but there was method in my madness. Once home, I ripped the black umbrella's canopy off its frame, threw out the frame, and ran the third canopy through the wash as well.


Cutting out the bag pieces proved a bit of a challenge. The compact-sized canopy just wasn't that big. I couldn't seem to find a way to lay out the half-size pattern piece twice on a fold the way the directions called for. In the end what I did was cut out the black lining pieces first and prepare two half-size paper pattern pieces. Then I pinned one of the black lining pieces flat on the canopy in order to use it as one full pattern, and then pinned the half-size pattern pieces on each side and chalked a 1/2" seam allowance for each. There was very little wiggle room for tartan-matching, but I managed to do pretty well on that score anyway. Just for the heck of it, I also ripped out the little Burberry tag that had been on one of the umbrella canopy seams. Then it was time to sew the pieces together.


The finished bag. I think it turned out pretty well, and even has a certain style to it.


The front and back of the tote bag. The pieced side doesn't look so bad. I thought seaming the two halves together made for a rather interesting effect.


The bag as it looks "inside out". My sister will have the option of using whatever look works best with her current outfit.


I sewed the original Burberry tag into the seam high on one side of the bag, then stitched the other three sides of the tag down (it wasn't a reversible tag). I thought it made for a nice finishing touch.


And for a final finishing touch, I rolled up the bag and stuck it in the original umbrella case. Having a little storage case for the tote bag will make it easy for my sister to keep the tote in her handbag for times of need.

So much for most of the compact umbrella canopy, and some of the black umbrella canopy. Now, what was I to do with the tartan canopy from the walking umbrella?


I toyed with the idea of making another tote bag for me, but I didn't much like the idea, given that I have a set of six tote bags already and don't need or want any more. Then one day an idea came to me. I've had the little case you see depicted above for over ten years, and use it to hold my manicure kit. It sits on a glass shelf in my bathroom, and looks nice there, but the lining had become stained. I was looking ruefully at it one Sunday morning as I was giving myself my usual weekly manicure, and thinking how bad it looked, and then it occurred to me that perhaps I could fix it by relining the manicure case. I looked closely at the lining and it seemed to me that it would be quite possible to replace it. Then I wondered what kind of fabric I would use to reline it, and it dawned on me that I had the perfect fabric on hand: a fabric I'd been looking for a way to use, that was waterproof nylon and could very likely be wiped clean in case of spills, and that would look really nice as a lining for that particular case. Who could ask for more?


The first step was to rip out the old lining. It was just fabric, cardboard, and glue. I kept all the pieces to use as patterns for the new lining inserts. The ribbons that hold the lid were still clean and in excellent condition, so I didn't remove them. While I had the case stripped down, I did some restorative gluing of some of the outer parts of the case that were coming loose.

I dug through my art supply cupboard and found some pieces of light cardboard I'd tucked away to use sometime -- things like inserts from a package of stockings, or remnants of poster board from some project. I did wind up reusing the strip of cardboard that lines the curved front side of the box, as I didn't have any cardboard of the size and flexibility to replace it. I always keep a bottle of glue on hand.


And here's the case with its new tartan lining.

The task of relining the case was pretty straightforward: I'd trace around the old piece of lining on one of my pieces of cardboard, cut the new piece of cardboard to match the old, cover the new lining piece with a piece of tartan nylon cut from the umbrella canopy using glue, and then glue the new lining piece in place in the reverse of the order that I'd stripped them out: first the bottom piece, then the curved side piece, then the back, then the lid piece. I elected not to put the mirror back in, as I don't need a mirror for manicures and pedicures. I'm really pleased with the new look.

But I did have quite a bit of that tartan walking umbrella canopy left, so....


I also made two new vanity cases out of the remaining tartan, and lined them with a white nylon lining fabric I had leftover from some project I made many years ago. One holds my emery boards, and the other holds my cotton balls and cotton swabs. I am as pleased with this manicure kit project as I was with the tote bag. I haven't just relined my manicure case -- I've upgraded it, and my only expense was two new zippers, purchased from Fabricland using a 50% off coupon.

But I still wasn't done.


I had been thinking for awhile that I must make myself some kind of tissue case to put in my backpack/shoulder bags/handbags, as I hated the way the tissues I carry around for any time of need get so rumpled and ripped and grubby before they're even used. I did a little googling and reading up on how to make tissue cases, and found that they're super easy to make. While I was planning to make a few for myself, I thought I might also make a few out of the umbrella canopies, if I had enough canopy left once I was done with the tote bag and manicure case projects. Again, umbrella fabric is waterproof, and should be ideal for keeping tissues clean and dry.

I did indeed have a little umbrella fabric left, so I whipped up the tissue cases you see above. (I used this tissue case tutorial, and then this tutorial on how to inter-fold the tissues.) The Burberry tartan tissue case (top left) is lined with more of the black walking umbrella canopy, and I shall give it to my sister when I give her tote. The other tartan tissue case (bottom left) is lined with another piece of the white nylon lining I used for the vanity cases, and I'm going to give that tissue case to my mother. Then I made two more tissue cases for me, the first (bottom right) from a remnant of jacquard decor fabric I had used for lining a handbag in 2018, and the second (top right) from remnants of brown vinyl and coppery brown satin lining I used to make a handbag in 2017, so I have tissue cases to match two of my handbags.

I think the Burberry tartan case is the nicest case of the four. The brown vinyl one is the one I am most dissatisfied with. I couldn't press the vinyl properly as the heat from the iron would have ruined it, and because of that, the top edges didn't come out even. This is a project that requires a fabric that irons into crisp folds. Oh well, it'll certainly do for now.

And that was the tale of three broken umbrellas, and how I used them to make three separate small presents, and to upgrade my manicure kit. Now the next time I see some poor, broken umbrella lying abandoned by the sidewalk in the rain, I may have to resist the urge to bring it home and show it some love.
Monday, February 10, 2020

A Valentine Jewelry Set


Carnelian is one of my favourite gemstones (the others being peridot, opal, aquamarine, and turquoise). There's something so warm and satisfying about it. I have an antique carnelian Art Nouveau-style gold ring and a heart-shaped carnelian pendant on a gold chain that I love to wear. Years ago I bought a secondhand necklace of carnelian chips/beads, combined with worn gold-tone beads, online. It was shakily assembled, so I restrung and reworked it slightly with new gold tone beads, but I was never happy with it. I did it a second time with brass-tone beads and still didn't like it much. For its third re-working I decided I'd get rid of all the metal beads and just go with red beads in different sizes and shades. I bought one string of dyed fire agate beads at Michaels with a 55% off coupon, and then a second necklace of varied plastic red beads at Value Village, took both necklaces apart, and went to work. (I thought I took a photo of that thrift shop necklace, but if I did I can't find it.)


And here's the result, which I am quite happy with. These pieces are a mix of carnelian chips, carnelian beads (the larger red beads you see in the necklace and earrings), dyed fire agate beads (the large golden orange beads you see in the necklace and earrings), small red plastic beads (such as the ones in the bracelet), and red plastic seed beads (used as spacer beads).

I love the play of all the shades of red. I like the look of chips separated by spacer beads. I had plenty of beads to work with and liked the necklace, which I made first, so much that I made earrings too, and a week later began thinking that maybe I'd also like a bracelet. I still have more carnelian chips and red beads left, but am out of body parts I'd care to decorate with such pieces.:)

As long as this project took, I now have the perfect pieces to wear on Valentine's Day, and just in time.

Tuesday, March 12, 2019

Clipping Along


This project plan began to evolve when I wanted to replace my functional but ugly fridge magnet clips and couldn't find any decent non-tacky, non-cheesy fridge magnets for sale anywhere. Then I happened to see some DIY glass marble magnets tutorials on Pinterest, but while I thought they were very pretty I've never found that the kind of fridge magnet that's intended to be placed over, or partially over, an item has much holding power; I wanted good strong clip magnets. But then I realized there was a way to combine the strength of the clips with the attractiveness of the marble magnets, and got so fired up with enthusiasm for my idea that I purchased nine new magnet clips with the idea that I would make a set not only for me but also two additional sets for my mother and sister as stocking stuffers for Christmas 2019.


These were the original four clips I've been using on my fridge for years. The metal had gone dark and spotted over the years and needed sprucing up. After a failed attempt to paint them with some metallic craft paint, I painted them with some "hammered bronze" Tremclad I had on hand. I bought a bag of dollar store marbles and stuck four of them on a scrap of rose print wrapping paper with Modge Podge, and once it had dried, cut away the excess paper. Then I glued the marble onto the magnet clip with all-purpose white glue. This is the set for my mother. She's an avid gardener so floral images were a good choice for her.


This is my sister's set. I left her clips unpainted as I thought the existing metal tone went better with the images I used, which were cut from an old calendar. Her kitchen has some blue and yellow in it, though it's mostly white, so these clips should go well with her decor.


This is my set. I've been using them for over a week as of this writing, and they seem perfectly functional. I was afraid the marbles wouldn't stay put, but I've got ten months to test their staying power before I give away the other two sets, and so far they've remained securely in place. I could have left these clips unpainted since they were new, but after some internal debate I decided the bronze tone was a better fit with the images I'd chosen and with my kitchen. The images in the marbles are cut from an old Mucha calendar I had on hand. This set of clips will go well with my planned poppy-themed kitchen reno. Can't wait until the entirety of my ugly old kitchen is on par with these clips!

Monday, April 24, 2017

The Reincarnated Handbag


Back in 2016 I decided I could do with a dark brown handbag, and I couldn't seem to find one I liked for a price I could afford. Dark brown isn't in just now -- it's all about the butterscotch browns. So I thought I'd make a smallish dark brown handbag in vinyl to tide me over until I could find a suitable handbag to buy, but I'd then make sure any handbag I bought was a larger size in order to have both a small and a large brown handbag rather than two the same size.


I found this bag in a secondhand shop on Bloor Street for $20. As you can tell, I bought the bag for the purse frame and handle alone. In the months it took me to get to this project, I kept seeing the bag in the chest where I keep my materials, and every time I opened the chest to take something else out, I'd think, "Man, that thing is as ugly as sin."

Once I had the frame, I bought some brown vinyl. I already had a suitable lining fabric on hand. I re-used the old bag's cardboard insert and also used a heavy interfacing to give the new bag some stability.


I wasn't crazy about the daisy detailing on the frame -- it's a little too girly and fussy an effect for my tastes -- but I decided I could live with it. I was unlikely to find a purse frame online for $20 or less.

The first step in the bag-making project was to take the purse completely apart so that I could use both the the outer fabric and the lining as the pattern for the new brown vinyl bag.


Here's the finished bag. It's definitely much less of an eyesore than the previous incarnation.


The purse also has a chain that can be tucked inside the bag if not currently wanted. I had to tie a slip knot in it to make it the right length for me.


A side view.


Bottom view.


The lining with its pockets. The old bag had only one small pocket, but I improved on that.

And a few weeks ago I finally found a nice, new-to-me brown leather shoulder bag on eBay. It arrived in the mail last week, and I've finished this smaller bag, so now I'm all set for dark brown handbags.

I've also had a hard time finding dark brown shoes, but alas, I am no shoemaker, so I'll have to keep looking for those.

Sunday, April 16, 2017

Wardrobe Malfunction Insurance


Sometime back I decided I wanted a sewing kit that I could keep in my suitcase in case of any possible wardrobe malfunctions that I might experience when away from home. They sell such kits at Fabricland and at craft and dollar stores, but I never felt inclined to buy any of those kits because they weren't attractive and often didn't appear to have decent quality items. I know from experience that commercially made sewing kits sometimes have very poor quality thread. Then one day when looking for fresh knitting post shares for my knitting blog's Facebook page, I caught sight of some of the homemade sewing kits on Pinterest (I seriously cannot believe what some crafters can do with old Altoid tins), and decided to put my own little kit together.


First I bought this eyeglass case from Value Vilage for $1. I picked a coppery brown one because it matched my brown-checked luggage set. Then I made a list of all the things I'd like to put in it: scissors, a thimble, a measuring tape, a stitch ripper, a thread card, and a needle book containing pins and needles.


I bought the scissors, the thimble, and the tape measure as a kit from Fabriclands. I got it 75% off, and even at that I was still paying too much for it, but it *is* such a perfect and pretty little set of tools for my purpose.


I got the stitch ripper at a discount at Fabricland too. The thread card I made myself out of an old greeting card and a selection of the threads I had on hand. I tried to include every reasonably possible colour. Then I just needed to make a needle book, which is something else Pinterest has a jaw-dropping array of.


This is the needle book I made. For the sake of accuracy, I might as well say that this is the *second* needle book I made. The first I made out of a scrap of gold-embroidered satin I had left over from an ugly old secondhand purse I took apart so I could use the handle. Hideous as that satin was when part of a purse, it was the perfect fabric to go with the rest of the kit. And the needle book turned out pretty well except for one thing: I used glue to attach the felt pages to the embroidered satin cover, and the glue showed through the satin as black smudge-like marks. It ruined the look of the needlebook, and I had no more suitable pieces of that embroidered satin.

For take two of my needle book project, I hunted through my fabric remnants to see what I had that would go with the rest of the sewing kit. The best I could do was some pieces of red velvet. I decided to link it to the other things by detailing it in gold. So, as you can see, I made little gold embroidery thread ties, and added two little gold beads to the end of the ties -- the last two of that kind that I had left in my box of beading supplies. I also embroidered a little floral design on the front in gold embroidery thread, even though I'm not much of an embroiderer -- it had been many years since I'd done any real embroidery, and I never did know more than a few basic stitches. My stitches look a little crude, but I suppose they'll have to do.


I also stitched the felt pages together with embroidery thread. And this time when it came time to attach the pages and the cover, I used sewing thread to tack the outside page and the cover together at the corners and in the centre. I was taking no more chances with the glue.

There are much cuter and more artful hand-assembled sewing kits on Pinterest, but this one is presentable enough, and will certainly prove as handy as any other sewing kit should I ever have to deal with a popped off button or ripped out hem while away from home.