Tuesday, December 25, 2018
Cosmetic Cases Are In Plastic; It's Fantastic
Over a year ago my sister asked me to sew her a vanity case and a makeup brush storage case, using tutorials that she flipped me links for via Pinterest's messaging system. My sister isn't really a crafter, having never gotten beyond the beginner levels of sewing, knitting, etc., and doesn't often make things herself. But then I suppose why would she when she can just put in an order with me or our mother and have whatever she wants custom made for a birthday or Christmas present? It's a system that works quite well for her if she doesn't mind a relatively long lead time.
But I was game to make her the cosmetics set, and I asked her what kind of colour scheme she wanted. She told me "black outside, and a colourful fabric inside". Okay then. I went to Fabricland, found their vinyl laminate, and batting for inside the brush case, then found some black fabric and double fold black bias tape. When I then looked for a bright print that would look good with the black, I found the above hot pink print on the clearance table, with its cute print of beads and little silhouetted heads. I wasn't sure how my sister would feel about the hot pink but hey, it was colourful, she didn't specify colour, and she had told me in the past that the only colour she really didn't like was lime green.
But once I got the fabric home and began working with it, the unfortunate truth began to dawn on me.
The fabric was Barbie fabric. I had bought Barbie fabric to make a makeup brush case and vanity case for my 42-year-old sister, and she was probably going to be less than thrilled about it. I wanted to kick myself for not having clued in faster, but at the same time... it was hilarious.
By the time I realized the true nature of the fabric it was too late to turn back; I'd made the vanity case, and it was a bit of pain I wasn't willing to go through again soon. The vanity case instructions don't call for covering the lining with vinyl laminate, but I did anyway. I know from experience that vanity cases get stained on the inside with makeup, and that it looks bad. The laminate made the project slightly more difficult to turn inside out, and I left the turning gap on the bottom seam of the *outer* fabric rather than on the bottom seam of the *lining fabric* as the instructions say, so that I wouldn't have to handsew laminated fabric. I was able to slip stitch the bottom seam closed very unobtrusively.
The next step was making the makeup brush case. The instructions only called for laminating the bottom layer of fabric, but I laminated the pocket too, as it would be likely to get some makeup on it as well. The project went pretty smoothly, as the Sew4Home tutorial is well-written. I did have difficulty sewing on the bias tape, and never was able to get the machine to stitch around the corners properly. After several attempts I just said screw it, ripped out the corners a final time and then stitched them in place by hand, working one side of each corner at a time -- a time-consuming job, but I got the results I wanted.
The finished set. At least the cases look the way they're supposed to look from the outside. My plan for Christmas morning present time is to see whether my sister notices the Barbie heads or not. If she doesn't, that will allow her to decide whether she likes the set without prejudice. If she does start to figure out that something's amiss, I suppose that'll be my cue to bolt for safety. Either way I'll probably have to promise her a new, non-Barbie set a few years down the road to smooth things over. My sister is not a Barbie girl in a Barbie world.
ETA: I gave my sister this pair of cosmetic cases for Christmas, and she neither figured out that it was Barbie fabric on her own nor seem to care when I told her it was. She seemed reasonably pleased with this set -- not as pleased as she was with the Sherlock fangirl kit I gave her two years before, but pleased enough.
The Birthday Necklace That Showed Up at Christmas and Went Out for New Year's Eve
This year for my sister's birthday I decided I'd like to make her a necklace and earrings set. I'd never made a pair of earrings before, but what the hay, it was time I learned. She likes black, so I wanted to make a necklace that was primarily but not wholly black, as too much black gets heavy and funeral-looking very quickly. I find the bead section at Michaels, or any bead store, rather overwhelming, so I did what I usually do: I found a pendant or a string of beads that I love or that at least especially caught my eye, and then built the design around it.
Here's the finished necklace and earrings. I found the pendant first. It's some kind of polished stone. Then I found the glittery beads that I thought echoed the rhinestones around the pendant, and then some plain-ish black beads. The silver bale on the pendant led me to decide on silver spacer beads. And then I learned how to use head pins and clasps to make earrings, and came up with a configuration of beads that pleased me for them. It's not like that's rocket science. I'm pretty pleased with the set -- it even strikes me as rather glam -- and I'm going to give it to my sister for Christmas instead of her (January) birthday so that I'll get to see her open them. Besides, she might want to wear this set out for New Year's Eve.
Once I'd finished making these pieces, I spent some time reorganizing my box of beads, findings, and tools, and thinking about my approach to beading. I don't think I'll ever get very into beading. If there were a way to make decent money selling my jewelry I'd consider it, but beading supplies are too expensive to make competitive pricing possible. It's reasonably cost-efficient to make jewelry for yourself or a gift, but selling handmade jewelry is a different matter because one needs to charge enough to be compensated for the value of the work (and the shopping) involved, and then the resulting price will be too high to attract anyone who might buy it. I plan to keep making jewelry because I do enjoy it, but only when I can justify the cost of a new piece for myself, or need a gift for someone. I've resolved that my beading supplies must continue to fit within the confines of the box I keep them in -- there will be no more impulse buying of beads to use "someday" as I have done sometimes in the past. But I'd like to develop my skills, and I feel I can certainly do so within the parameters I've set for myself. My next jewelry piece will probably be quite an elaborate affair -- for me, that is. All I've made so far is simple one-strand necklaces and this one pair of earrings.
Thursday, December 13, 2018
The Alchemical Scarf
This post contains an account of my first foray into a craft I haven't previously tried: dyeing.
In August 2017, I received the gold scarf you see photographed above for my birthday. I was dubious about that greenish dull gold shade from the moment I saw it, and a look through my closet and in the mirror confirmed what I'd feared: that it didn't go with anything I had, and that the colour looked awful on me. However, the scarf was pure silk, which made it both possible and worthwhile to dye it a different, more flattering and wearable colour.
I have almost no experience dyeing textiles, so I posted to AskMetafilter that day asking for advice on how to proceed. Some months later I bought a tin of Dylon dye in Tangerine (39). But that was as far as the project got for about a year. The tin of dye sat in my kitchen junk drawer. I tend to put things off when I'm afraid I won't be able to do them right, and as a crafter I know how beginner projects are all too prone to turn out, especially when the beginner crafter doesn't do sufficient prep to be reasonably sure of what the process entails. That tin of dye hadn't even come with instructions, and there was no way for even an experienced dyer to know what kind of colour might result from using it in combination with the existing gold.
In mid-October 2018, I visited G&S Dye and Accessories Ltd., on Dundas Street West in Toronto, for some knowledgeable and in-person advice. I showed the sales associate the scarf, explained that I didn't like the colour and that it didn't suit me, and asked for help in selecting a dye. The store associate, who made a distressed face at the sight of the scarf against my face, was very helpful. She suggested different colours, gave me a copy of a sheet of instructions for various dyeing methods, and pointed out that it couldn't hurt to try dyeing the scarf given that I couldn't possibly make the scarf's colour worse than it already was. I decided I'd use the tin of dye I had on hand first and see how that went.
A few days ago, armed with my instruction sheet and the tin of Dylon dye, I applied the dye using the stove top method that's supposed to be the best method. I dumped in the tin's contents (there was approximately one tablespoon of powdered dye in it) and then, when I saw how dark the water and the scarf looked, spent the entire dyeing time kicking myself for having used what I thought was too much dye. Of course I reminded myself that I wouldn't know what the actual colour was until the scarf was rinsed and dried, but that didn't help all that much. The scarf appeared to be a dark rust while simmering in the dye pot.
Here's the final result. The silk took the dye beautifully, the former dull, greenish gold turned a beautiful, rich copper colour that's extremely becoming to me, and I could hardly be more pleased with such an alchemical coup. One of my fears was that I'd wind up with a mess in my kitchen, but I didn't spill a drop of dye and never even got any on my hands. When I hung the rinsed, washed, and squeezed scarf to dry over the shower curtain bar in the bathroom, I carefully shifted the shower curtain and bathmat out of dripping range, but if that scarf dripped at all it was only clear water. The process couldn't have gone more smoothly and the results were awesome. I was left with the urge to dye everything in the house.
Here's the now copper silk scarf styled with one of my dresses, and with a skirt and top outfit. This scarf goes with two of my dresses, two of my skirts, and one pair of my trousers, besides some plain basic pieces. I'm sure I'll have plenty of chances to wear it. And now I'm looking into making and dyeing/painting a silk scarf in the coming year, since I want one in a very specific colourway and can't seem to find one that's commercially made.
Friday, November 30, 2018
The Many Shades of Brown Sweater
Late this summer I began to think that I could really use a simple dark brown sweater that I could wear with a number of my skirts and trousers. I do have this sweater, but it needs to be worn with a scarf, and the brown yarn it's made from isn't quite dark enough that it goes with the items I wanted to wear with a brown sweater.
To digress here for a moment, brown can be a challenging foundation colour. Black is black unless it's faded, and always goes together with a snap, but there are no end of shades of brown out there, and they don't all work together, which can make it difficult to assemble outfits out of separate brown items. However, I look terrible in black, so brown it is and must continue to be. I've recently made it a rule to buy brown clothing, shoes, and accessories in either a dark chocolate brown or a butterscotch/cognac brown – if I the item that I want to get in brown isn't available in either of those two shades, I don't buy it at all. If I abide by this rule, I can at least be reasonably assured of having just two uniform shades of brown to work with, which will help a lot when I'm mixing and matching. Dark chocolate brown is my first preference, and I have a number of basic clothing pieces in it as well as bags and shoes and belts, while the butterscotch/cognac brown is mostly just for shoes and bags, and even then is generally intended/reserved for summer wear, because it looks better in all that hot summer sunlight and with my lighter, brighter summer clothes than the chocolate brown.
Having identified the basic type and colour of sweater I wanted, my next step was to search Ravelry's pattern database for a solid colour pullover design in a fingering weight. I further narrowed the search by selecting the neckline styles that best suit me: v-neck, scoop, cowl, possibly ballet. After some wavering between two finalists, I selected the Obsidian pattern, designed by Lisa Mutch, that you see pictured above. It's more minimalist and contemporary than the kind of style I usually go for, but it would go really well with all the pieces I wanted it for, it has an undeniably sleek, modern appeal, and I loved that the funnel neck could be styled as a cape, a cowl, off one shoulder, or as a hood. That's a serious amount of style potential for one simple little sweater.
The next step was to buy the yarn, and there I ran into the "many shades of brown" problem again. It proved so difficult to find a machine washable fingering weight yarn in a dark chocolate brown at Romni Wools that even the store associate who was helping me gave up the task as a lost cause after twenty minutes or so, but I kept searching and hoping, refusing to settle for the too light or purplish(!) brown or handwash only yarns I came across, until I found a yarn in the right shade. In the end, I bought 400 grams of BC Garn Soft Silk, which is 100% slightly raw silk and proved quite lovely to work with.
And here's the finished item. The pattern was pretty well written and I encountered no serious problems in knitting this project, though I did have to experiment with different cast ons in order to find the stretchiest possible one for the neck so that it would fit over my shoulders. I made just one modification, which was to make the sleeves full length rather than elbow length, as that's an unflattering length on me. I did wish the designer had included instructions for different sleeve lengths, but it wasn't like it was hard to figure out how to lengthen them. This sweater looks very small when lying flat, but that's how it needs to be as garter stitch has a lot of give. Making this sweater in the size that would ordinarily fit me would have saddled me (literally) with a sad, baggy sweater instead of the svelte, figure-hugging piece it's supposed to be.
And now I have the basic but stylish brown sweater that I wanted, and that goes with so many of my skirts and trousers that I can use it to make any number of outfits.
This sweater was made with newly purchased yarn and I had 50 grams left when I finished it, which leaves me with a 50 gram stash increase.
Monday, November 12, 2018
The Baby Shower Insurance Jacket
This year I've been looking at my four remaining boxes of stash yarn and trying to come up with a plan to use it up more quickly than I've been doing. It's mostly just odds and ends of yarn, not matched lots that would be suitable for making whole items. I was looking especially at my box of worsted yarns and wondering what I could do with it, since I don't work with worsted much anymore. The colours I have in that box play together quite well, and for quite some time I toyed with the idea of using it to make an afghan. But I'd have to buy quite a lot of yarn to use as a base colour to tie the other colours together, and I didn't even particularly want an afghan, at least not of that style, or know anyone I could gift it to. Then I hit upon a plan: I would use my stash yarn to make baby clothes and toys, which all those half skeins would be perfect for, and put them away to give as shower gifts. If there's one thing I can count on, it's that there are always bound to be more babies appearing on the scene, and it would be so nice not to have to scramble to get something made in time to give it to the new parents.
This year I shall have time to make just one stash yarn baby gift, but going forward I'll wait until the end of the year when all the rest of the items on my list are finished, and then whip up as many baby things as I have time for.
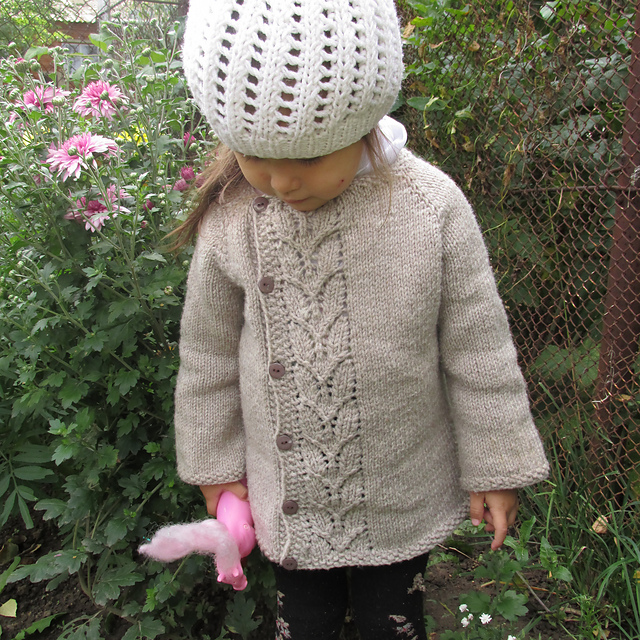
For the one baby item I made this year, I took from my box of worsted weight yarns 150 grams of Phentex Merit acrylic worsted in "Aqua" (left over from this turquoise cardigan, which I made for me back in 2013). Then I searched Ravelry for a suitable baby clothing pattern and found the Leaf Love Baby Sweater, by Taiga Hilliard Designs. I had enough turquoise yarn to make it in the 6-12 months size.
Here's the finished item. It was quite an easy, quick knit, and finishing was a snap since there were no seams to sew. I was also fortunate enough to find buttons that went really well with the yarn -- turquoise can be a difficult colour to coordinate.
This project used 120 grams of stash yarn.
Sunday, October 14, 2018
Art Nouveau and Jeans
For my first sweater for me of 2018, I decided I wanted something with an Art Nouveau flavour to it.
Accordingly, I searched Ravelry for a woman's pullover pattern in a fingering weight that had some Art Nouveau-esque detailing. I found exactly what I was looking for in the design pictured above, which is May it Be, designed by Annamária Ötvös. I loved the yoke and the ballet neckline and the slightly textured but otherwise plain body of the sweater that set off the yoke. Design that combine Art Nouveau-style detailing with the practicality and wearability of contemporary clothing is very much my vibe.
When it came time to buy the yarn for this project, my plan was to go to Romni Wools, pick out a variegated yarn that I loved, and then buy a monotone yarn that complemented it. My first choice in variegated yarn was a vivid orange variegated, and then I found a solid teal that worked really well with it. But then upon looking for a second option for the main colour that would be less expensive, I came across Berroco's Remix Light in 6984 Ocean, which was a tweedy teal with slubs of white and turquoise. It was quite a bit less expensive than the solid teal, and I liked it just as much. But it didn't go quite so well with that bright orange variegated I had picked out. After some hemming and hawing and and trying unsuccessfully to convince myself either to pay more for the solid teal or live with the combination of the tweedy teal and the bright orange variegated, it occurred to me that I should instead replace the original orange variegated with a different, less saturated orange yarn. I promptly found a skein of Malabrigo Sock in 802 Terracota, which is a sort of burnt orange variegated. It worked beautifully with the tweedy teal, and when I consulted the store's mirror it was immediately clear that the combination of the tweedy teal and the burnt orange was more becoming to me than the more vivid orange and solid teal.
Here's the finished sweater. My only modification was the addition of waist shaping. I found this design quite slow going but otherwise a straightforward knit. I did astonishingly little ripping out -- I seldom made mistakes, and then caught them almost immediately so that I never had to rip out more than a dozen stitches at a time.
I don't believe this sweater will go with anything in my wardrobe but jeans. Teal is a difficult shade to match, and even the teal suiting fabric I have on hand and that is intended to become a teal jacket and skirt in the near future doesn't quite go with this sweater. But I don't mind. This is a sweater with such visual interest that it will turn even a jeans and sweater pairing into something special, and these days jeans go nearly everywhere.
Friday, October 12, 2018
Skirting the Unsatisfactory Dress Issue
Earlier this year I took a unusable dress out of my wardrobe and turned it into a skirt, and I began thinking about how it was the fourth time I had done such a thing, and that perhaps I should write a blog post about the process. And here we are.
The fabric above belongs to a dress I used to have that I must have made circa 2005 or so. I loved the fabric on sight and still love it.
Here's a shot of the dress as it was. Not only did I love this dress, but it had history. In its day, this dress went to an Elvis wedding in Las Vegas in 2006, and to Raleigh, North Carolina in 2008, and to the office, and to parties, and probably a number of other places I'm not thinking of now. But... by 2016 the style had become dated and too young for me and I no longer cared to wear it as was. Yet I couldn't bear to give it to a thrift shop. So I came up with the idea of cutting it down into a skirt in order to get some more wear out of it.
Here's the skirt, which passes for current, and which I will likely be able to wear until it's worn out. Turning a jersey dress into a jersey skirt takes very little time or skill. Figure out where you want the waistband of the skirt to be, mark the spot, cut the bodice off 1" or so above that, make a casing out of that extra 1", insert a piece of 0.5" wide elastic into the casing, and you're done.
Here's another former jersey dress now living a new life as a skirt. In this case, the dress was nice (I don't seem to have a picture of it anywhere), but the wrong cut for me. I don't know why it took me so long to figure out that I do NOT look good in an empire-waisted dress. I remember cutting both of these dresses down into skirts on the same day. I think it took half of an afternoon.
Here's another dress that was unsatisfactory as was. I made it years ago before I clued in that I need to lengthen the bodice of my dresses to provide vertical room for my chest. I loved this dress and the lovely crisp fabric it was made from, but the waistline sat well above my actual waistline and looked terrible, and consequently the dress was basically unwearable for me. In short, it was another candidate for skirt surgery.
The dress above reincarnated into a skirt. This is a woven fabric rather than a jersey, which made the conversion process slightly more complex. First I ripped the bodice off the dress. When I came to the zipper at the back, I first made sure the zipper tab was at the bottom of the zipper and then simply cut through the zipper. Then I searched through my pattern collection to find a particular favourite skirt pattern that I know fits me well, and borrowed the waist facing pattern pieces from it. I compared the facing pattern pieces to the top of the skirt, and found it was a little wide, so I ripped open the side seams, cut them slightly to taper them in so that they would accord with the pattern pieces, and then stitched the seams back together.
Then I cut the facing pieces out of the bodice. I had to cut them lengthwise, against the grain, but that didn't matter in any practical sense -- they're only facings after all. I interfaced the facing pieces and otherwise prepared them just as I would if I were making a skirt from that pattern, and stitched them into the waist of the skirt. The shortened zipper ends of the former dress-length zipper were stitched into the "waist and facing" seam at the top so I had a skirt-length zipper without having the work or the expense of putting in a new one. And then I had a skirt that looked exactly as though it had been intended to be a skirt all along.
And here's a fourth skirt that was originally intended to be an empire-waisted dress. In this case, it was a dress I never even finished as I realized that it wasn't going to fit or look right. It had been a fairly expensive dress by my standards and once I faced up to the reality that there was no possible way for me to make my original plan for a georgette dress work, I decided it was better to have a pricey skirt than expensive garbage. Just as in the case of the dress above, I made some waist facings out of the bodice (in this case I think I made my own waist facing pattern pieces out of paper by tracing around the top of the skirt pieces), and sewed them in. I think I had to piece the facing pieces on the inside because I just couldn't get both facing pieces out of the bodice pieces, but then no one but me will ever see that.
If you've got a dress that's unwearable for some reason but the skirt part of it fits and is in good shape, I'd suggest cutting it down into a skirt. As you can see from this post, it can be done without more expense than that involved in buying some elastic or interfacing and thread, and in such a way that no one will ever know that the skirt was ever a dress.
Unless you decide to write a blog post about it and effectively tell the whole world, of course.
Subscribe to:
Posts (Atom)