Showing posts with label crocheting. Show all posts

Friday, March 18, 2022

A "Welcome to the World" Gift


On my birthday in August 2021, when my parents and sister came to my house for a birthday lunch, my favourite gift of any that I received was the news that my nephew Luke and his wife were expecting their first child in February 2022. Of course, my immediate response was to start planning what I was going to make for my impending grandniece or grandnephew. By the end of that day I had decided I would make the baby a baby blanket, a pair of booties, and a framed counted cross stitch motif with the baby's name on it out of a kit I had on hand. I selected suitable patterns for both a baby boy and a baby girl, and messaged Luke with my congratulations and a request that he let me know if he and his wife were having a grandniece or grandnephew in advance, as I'd be making something for the baby and would need some lead time. In due course, he dutifully let me know that they were expecting a boy. 


The pattern you see above is the one I'd selected for a boy, the ABC Baby Blanket, designed by Jenny Williams. It's an attractive, easy, quick knit. It could even be an excellent stash buster if one knitted the squares in different colours, but I wanted a solid colour for my version. 

The yarn I chose was Lion Brand's Wool Ease in the Stillwater shade, which is what I would describe a light sea green. It's 20% wool, 80% acrylic, which gives it both the nice feel of wool and makes it easy care and (I hope!) durable, which is just what one wants in a baby blanket, especially if this particular baby has inherited his father's trick stomach. 

This project knitted up quickly and without issue. As I worked, I thought back to the baby blanket I had made for Luke when he was born in September 1987, just a month after my fourteenth birthday. In those days I didn't have much access to patterns or yarn. I never even knew Vogue Knitting magazine existed at that point -- that revelation would come when I saw it on the newsstand in a convenience store when my mother and I stopped to get milk one evening the following spring. The baby blanket that I made for Luke wasn't made according to a pattern at all. I knitted a number of garter stitch squares in pastel blue and white baby yarn, and sewed them together. I'd never make something so basic now. I don't think I even wove in the ends, and I know the squares weren't properly seamed together. I was, after all, only thirteen. But that hackwork baby blanket became Luke's blankie and he was very, very attached to it. Over the next several years Blankie became very much the worse for the wear. It was no longer the fresh blue and white it had been when new, but rather grayish, with a number of "you don't even want to know what made that" stains and discolourations, and was fraying and raveling in a number of places. It got to the point that it was such a repulsive object that I could never see it without wanting to scream, "KILL IT WITH FIRE!!!!" and stuff it in the wood stove at my brother's farmhouse. 

Then one mid-winter day when Lukie was four, he took his blanket outdoors with him when he went out to play, left it outside, and didn't realize it was missing until bedtime. Luke became agitated and wanted a search to be made, but trying to find a grayish blanket after nightfall on a farm in mid-winter in Southwestern Ontario is an exercise in futility if I ever heard of one. The blanket could have been anywhere in quite a large, unlit area, there were piles of snow everywhere, and it had snowed that afternoon. My brother tried to take the tough love approach, saying to him firmly at eight o'clock, "No Luke, you took your blanket outside when you shouldn't have and you lost it, and you're just going to have to go to bed without it and we'll have a look for it tomorrow." This stern parental reasoning was apparently lost on Luke, as when ten o'clock arrived he was still screaming. Sympathy, substitutes, bribes, and threats were also of no avail. My brother and his wife were, as my sister-in-law has put it, "out there like a pair of fools with flashlights and shovels until well past eleven" in a desperate effort to find the blanket, while Luke stood at the storm door, alternately and repeatedly screaming, "FIND IT!!!!! FIND IT!!!!!" and sobbing loudly. They couldn't find it. Luke ultimately passed out from sheer exhaustion at about midnight, after he'd been carrying on non-stop for four hours straight.  

I have thought of that first baby blanket I ever made and of that incident every time I have knitted a baby blanket since, and hoped I wasn't kickstarting a similar chain of events for the new baby's poor parents. And now I've come full circle, and have knit a baby blanket for Luke's son. I wouldn't wish an evening like that on any parent, but I suppose if it should happen my brother and his wife's reaction will be something along the lines of, "PAYBACK SOMETHING SOMETHING, LUKIE."   


The finished blanket. It's much nicer than the one I made for Luke, with a better design, better yarn, and better workmanship, and I am pleased with it, but I can't help feeling that perhaps it should have been scarlet or some other eye-catching colour, lest it get left outside at night. 

I purchased all new yarn for this blanket, and had 55 grams leftover, so that's a stash increase of 55 grams. 


When I first began searching Ravelry for patterns for a baby blanket and booties for my nephew's child, I thought something hockey-related would be a fun idea. Luke loves hockey as much as most Canadian men do, which is to say to an extent that is beyond all reason. During a hockey game in late 2007, when Luke was 20 years old, he got hit in the face with a puck, and it smashed four of his teeth. Luke proceeded to remain on the ice, playing and spitting out fragments of teeth, until the game was over. Surely my needlework skills could produce a softer, gentler tribute to his love of hockey than his dental work. I initially even toyed with the idea of making a Maple Leafs baby blanket in tribute to Luke's favourite team, but I would have had to design one myself, which I wasn't particularly interested in doing, and besides, this baby is an Albertan. I don't want him to be a social outcast or a laughingstock among all his baby friends. 

Among the hockey-related patterns to be found on Ravelry were a few designs for hockey skate booties. There were both knitted and crocheted examples of that design concept, but though I don't enjoy crocheting, there was no denying that the crocheted version was much cuter. Generally speaking, crocheting is stiffer than knitting, but while knitting tends to be the better choice for clothing because it drapes better, crocheting often takes the lead when it comes to shaped objects like toys, and one wants the object to hold its shape. The sample knitted hockey skate booties looked so limp and floppy compared to the crocheted ones. I set my teeth, resigned myself to crocheting my grandnephew's booties, and went with the Newborn Hockey Skate Booties, designed by Jamie Louise. When I checked my yarn stash, I was pleased to discover that I had black, gray, and white worsted yarns on hand that were suitable for this project. I no longer have the ball bands for any of the three yarns I used, but they were run-of-the-mill acrylic worsteds. I did have to buy a 3.75mm crochet hook, but now I'll have that size hook in my crochet hook collection for the next time I need one. You can see the resulting booties above, and I think they turned out well, and that Luke will get a kick out of them. 

These booties, which were made entirely out of stash yarn, weighed in at 50 grams when finished, so that's a stash decrease of -50 grams. 


Several years back, I happened to come across some counted cross stitch kits in Dollarama for $3.50 each, which is a very good deal for that sort of kit -- one could easily pay ten times as much for a comparable kit from a regular retail outlet. With money so tight, I try very hard not to buy things for the indefinite future, as I need to focus on fulfilling my many immediate needs, and I didn't even know of any impending babies at the time. However, these kits (which were all the same pattern) were so very cute and the price was such a great bargain that I made an exception and bought three kits. After all, I was very likely to use them all eventually. Then, when I got to cash register, the kits rang in at $3 a kit, which put the total expense after tax at $10.17. 

On the day I heard that there was a new baby on the way, I thought almost immediately of those three gifts, and went to the attic to get one of them out of the chest of drawers where they were stored, pleased that my investment had been justified, or at least 33.33333% justified. I started the kit that very night. I think it took me about two months' of needlework time to finish it, although I worked at it in fits and starts between August and January. By the end of January, I'd finished all of the cross stitch but the little section that was to contain the baby's name, and I'd also bought a thrift shop frame for it, and researched how to frame needlework. 

Sawyer was born in mid-February, and I got right to work on the name section, finishing it in a matter of days. Then it was time to frame it. I'd never done any framing to speak of before. Professional framing used to be one of my few extravagances, but I can no longer afford such a thing, and it was time to learn to do it myself. I paged through a book on framing that I'd bought at a thrift shop some years back, and looked at online tutorials and videos until I felt I had some idea of what I was doing. 

The simple wooden frame I bought at Value Village for this cross-stitch piece was the right width but something like 2.75" too wide, so I removed the bottom edge, cut down the sides using my handsaw and mitre box, and glued and nailed the frame back together. I then cut a piece of foam core board to fit the frame, and mounted the cross stitch on that using sequin pins. Then it was pop the foam core board into the frame, turn down the little metal tabs at the back, stick on a backing of brown craft paper, and add a hanging wire to the back. It turned out pretty well for a first attempt at framing. The needlework isn't perfectly straight, but it's straighter than either of the two professionally framed pieces of needlework I have in my house. And I like the way the tone of the wood accords with the colours in the cross stitch. It should make a nice addition to Sawyer's room for the first three or four years of his life.

There was originally glass in this frame, but I elected not to cut that glass down for the new frame size. This present had to be shipped to Alberta, and I was concerned that the glass might break on the way, and worse, damage the needlework. Not including the glass would also help keep the shipping cost of this gift down. 

I haven't gotten to meet Sawyer in person yet, and don't know when I will. My nephew and his wife and their son live in Alberta, and I can't afford to travel there. They will be visiting Ontario every few years, pandemic conditions allowing, but they'll mainly be visiting Luke's immediate family, who live two hours from me in a region where public transit doesn't go (I don't own a car), and they will have so many people to see during their time in Ontario that they won't be coming to Toronto just to see me. It isn't likely I'll ever see Sawyer more often than once every two or three years. But if I can make things for Sawyer's birthday or Christmas gifts that he routinely uses and enjoys, I can hope to have a little place in his life, and perhaps even help instill the kind of lifelong appreciation for handmade things in him that people who grow up having things made especially for them by loving family members tend to have.   

Anyway, this gift has been wrapped and packaged and posted and is currently on its way to Alberta, where I hope it will prove a suitable welcome to the world gift for what, judging from his pictures, looks to be a cuddly, happy little guy.  

Monday, January 3, 2022

A Calculated Project


I bought the calculator you see above at the age of 22, circa 1995 or 1996, for something in the neighbourhood of ten or twelve dollars. Twenty-six years later, while the calculator was still in perfect shape and working order, its black plastic vinyl cover had become cracked and torn. I'd been meaning to make a new cover for it for awhile, but when in December 2021 I began to take my calculator with me to the grocery store every week and pre-total my groceries before checking out as a way to make sure I stayed under my grocery budget, I decided it was time to get moving on that project. I wanted my calculator to look nice if I was going to be taking it out in public, and the old cover was very close to falling completely apart. 


I did consider just using the calculator sans cover, but then I reflected that there was probably a reason that the calculator still looked perfect while the original cover was in such bad shape. Notice how the number pads are still clearly legible, and the screen is unscratched? No, the calculator needed protection from wear and tear, and must have a new cover. 


This wasn't a project I was going to find some handy tutorial online for -- I was going to have to figure it out on my own. I gathered some supplies: brown vinyl (left over from when I made a handbag), lining fabric, coordinating thread for both fabrics, glue, thread elastic, a button from my button tin (it was one I had cut off a worn-out blouse I was throwing out), and the old cover, which I could employ as a pattern.  


I laid the old cover on the fabrics and used it as a guideline to how big the new piece should be -- the pieces needed to be the size of the old cover plus a good margin that I'd be folding inwards. The piece of fabric you see in this photo was supposed to be the lining piece of the cover, but I ended up not using it for reasons that will soon be explained.


I cut the old black covers apart and pulled out the cardboard pieces that had given them their shape. Though I had planned to use the cardboard pieces as pattern pieces for new ones, they were in such pristine condition that I simply reused them for the new cover. Leaving room for the flexible spine of the cover, I placed the cardboard forms on the piece of vinyl I had cut, and folded in and glued the edges of the vinyl. 


I used bulldog clips to secure the cover's inner edges until they could dry. One can't pin vinyl as it will leave holes, and it would be very difficult to pin it over cardboard anyway. 


The old cover had no fastener, and had always annoyed me by constantly flapping open. And it had always seemed so awkward to me that the spine was on the right side -- it seemed to me it should be on the left, as with a book. I decided that my cover would be oriented to flip open like a book and would also close securely. I considered a tab with a snap fastener, but eventually decided a button and an elastic loop would be my best bet. 

Vinyl doesn't hold hand stitching well -- the stitches just seem to tear out. I really should have affixed a square of interfacing to the underside of the cover piece before I glued it on to hold the button. Since I hadn't thought of that in time, I sewed the button in place by pushing my needle clear through the vinyl and the cardboard form and the vinyl on the other side and then back again, about twenty times. I had to use a thimble for this effort -- something I rarely do -- as it would have been too painful to push the needle through the cardboard with bare fingers.  


I crocheted a chain from the black thread elastic in order to make the button loop. It took me a few tries to figure out how to attach the elastic loop to the cover. Sewing didn't work as my stitches just tore out of the vinyl, and I couldn't think of a practical way to glue something so small and finicky. In the end I cut two squares of interfacing and used them to create a sort of glue sandwich that I could use to secure the ends of the elastic loop. Once that had dried, I glued the back of the interfacing square to the cover, after first testing its position to be sure it was situated properly to fasten the button.   


As indicated above, I'd originally planned to line the cover with a piece of satin lining. But when it proved so hard to stitch anything to the vinyl, and promised to be a time-consuming, pain in the ass, and very probably not at all successful job to sew the lining in, and I thought glue would seep through the satin lining and look bad, I opted to go for a vinyl lining. This was a much easier task, as I just had to cut a piece the right size and glue it in place. After I'd cut the piece of vinyl lining to the right size, I pinked the edges for a more finished look. 


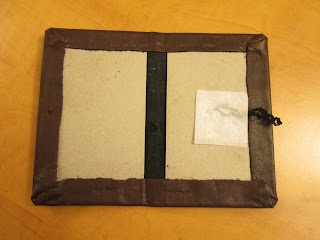
The finished project from the inside. The calculator is secured to the back flap of the cover by three strips of double-sided Scotch tape. I hope it holds, but if it doesn't, I will probably just try some stronger double-sided tape. In the old cover, the calculator was held in place by a strip of tape, and that held it in place for 26 years. 


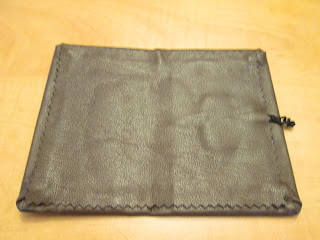
The finished calculator in all its buttoned glory. I'm pretty pleased with the result of my work on it. I don't know how long this cover will last -- I expect it to be less durable than the old one -- but now that I know exactly how to make a new one (and have documented the process, lest I forget), it'll be pretty easy for me to make another if necessary. 

I certainly like this cover better than the old one, it will coordinate well with the daily wear, convertible bag I always take to the grocery store, and this is a project that didn't cost me a penny. Can't beat that.

Wednesday, May 3, 2017

Kicks for My Sister


Last year my foster sister Gayle asked me to make her a pair of sneaker slippers she'd seen on Pinterest. I told her I wasn't going to be able to get to it until this year, and when she groaned about having to wait, asked her what had happened to the pair I made her the year before. She told me the heels were out of them.

I planned to get to the sneaker slippers in April. But just as I was nearing the halfway mark on the project before it, Gayle was diagnosed with a brain tumour. The day we were waiting to hear if the tumour was cancerous, I went about the house reminding myself to breathe. It was some relief that the test results indicated that the tumour had a 95% chance of being benign. Gayle was scheduled for neurosurgery on May 1st. I set aside my current project and began the slippers so that Gayle could have them in time for her hospital stay and recovery at home.


I bought the pattern, which was Slipper Socks, by Rea Jarvenpaa, and I asked Gayle what colours she wanted her slippers to be. She told me black and white. I had some "winter white" worsted on hand, so I bought a skein of black worsted and also a skein of gray craft yarn for the soles, with the idea of making these slippers more durable than the last pair, which were made entirely of worsted yarn.


And here, much frustration later, are the finished slippers. The instructions were woefully incomplete. The pattern gives no details on how much yarn is required. Half of the instructions for knitting the black socks that serve as the base for this pattern are simply missing -- there are no instructions on how to work the heel, turn the heel, pick up the stiches along the side, shape the foot, how long to make the foot, or shape the toes. There are separate instructions included for the socks included in the pattern, but as they required a different stitch count from those I'd begun knitting from the slipper instructions, they weren't much use. The pattern doesn't tell you how many stitches to pick up for the edges where the lacing goes. The instructions for the medallion for the ankle are missing. I was not at all happy that I'd paid €5.00(EUR) for a pattern and then had to write a third of it myself. I won't be buying any more patterns from Rea Jarvenpaa.

I also had a problem with making the soles, as they turned out too wide, though that is not a fault in the pattern, as I had used craft yarn for the bottom to make the slippers harder wearing and it was too bulky. I could have more or less fixed this issue by working only four of the five rounds called for in the instructions for the sole, but by the time I figured out that the sole was too wide I didn't have time to undo hours of work and do it again before my deadline. I went on with the job and put the slippers together as well as I could, finally finishing them the day before the surgery was to take place.


Then on the morning of May 1st I went downtown to the hospital where Gayle was to have surgery. I made sure to be there before her check-in time of 10:00 a.m. as I didn't want to miss my chance of giving her the slippers and seeing her for at least a minute or two before she was whisked away for the procedure. Gayle was delighted with the slippers. Her three daughters had brought her fancy ball caps (one had pink sequins!), and her ex-boyfriend a Rolling Stones bandanna to wear over her shaved head during recovery, and we joked that between her head gear and her kicks and having all of us for an entourage she'd be the most street patient in the entire hospital. She was checked in, given two wrist bands (I asked her if they were also going to microchip her), changed into the hospital-issued nightgown and robe and shower-cap-like slippers (her street-style accessories would have to bide their time until after the surgery), and set up with an IV. Then we waited with her. The surgery was originally supposed to be at 12:30, but we were told it would be delayed for a few hours. The extra waiting time did Gayle's stress levels no good whatsoever. It didn't help that she'd had nothing to eat all day, that the IV tube was hurting her hand, and the IV fluid was necessitating frequent runs for the bathroom. When she was finally wheeled into pre-op at about 2:30 p.m., she began sobbing.

And then at 3:00 p.m. we were told that the surgery would have to be postponed to another day because, though the surgical team was all ready to go, there was no ICU bed available for her post-op. Poor Gayle. She left the hospital with her new accessories and her long blond hair intact... but with no surgery date. I hope having the slippers are at least some small source of pleasure and comfort to her during the lead up to the next surgery date.

Tuesday, December 27, 2016

An Elementary Christmas Present


Over a year ago, my sister flipped me a link on Pinterest with the words, "Dude. I want this."


"This" being a crocheted Sherlock Holmes amigurumi, designed by Vilma Ilona. The doll, of course, is based on the character played by Benedict Cumberbatch in BBC's Sherlock, a show that (if her Pinterest board is any indication) my sister is obsessed with. She told me she wanted the doll to keep on her desk at work, so that she "could use it to talk to people with."

Yeah, I don't know either.


I dutifully added the doll to my project list, and here is my version of it. Most of the Ravelry members who made it seemed to use worsted or even bulky weight yarn for this project. I used sock yarn for it, because I didn't have the right colours in any other weight. I worked with two strands so that it wouldn't turn out too small, and I think the finished doll was just an inch or so bigger than the designer's sample was (I forgot to measure the finished doll, but I'd estimate that it is about 8" long). My version has some shortcomings. I didn't quite have the right gray -- Sherlock's overcoat is supposed to be a charcoal gray rather than this medium gray, but I thought it was close enough. I also didn't get the hair right -- this doll's hair looks more like eighties-era Kirk Cameron than current day Benedict Cumberbatch as Sherlock Holmes -- but again I thought it would do.

I can't say I enjoyed making it. I don't like crocheting and I don't like working on such a small scale, and the combination of the two drove me right up the wall. This little project took weeks because I simply couldn't keep myself at it. It was a huge relief to finally finish it in time, on Christmas Eve, and then to wrap it up with the things I'd bought to go with it and put it under the tree. Originally I'd planned for this doll to be a stocking stuffer, but then it occurred to me to expand on the concept and to make my sister's present a throughgoing fangirl kit. I bought first the notebook folder, and then the official Sherlock calendar with accompanying vinyl sticker that appears in the photo at the top of this post. I made sure to get a notebook folder with the "Get out. I need to go to my mind palace," quote on it because it's the sort of thing my sister would say. And judging from the way she chortled as she took each separate item from the package, the fangirl kit idea was very much on point.